


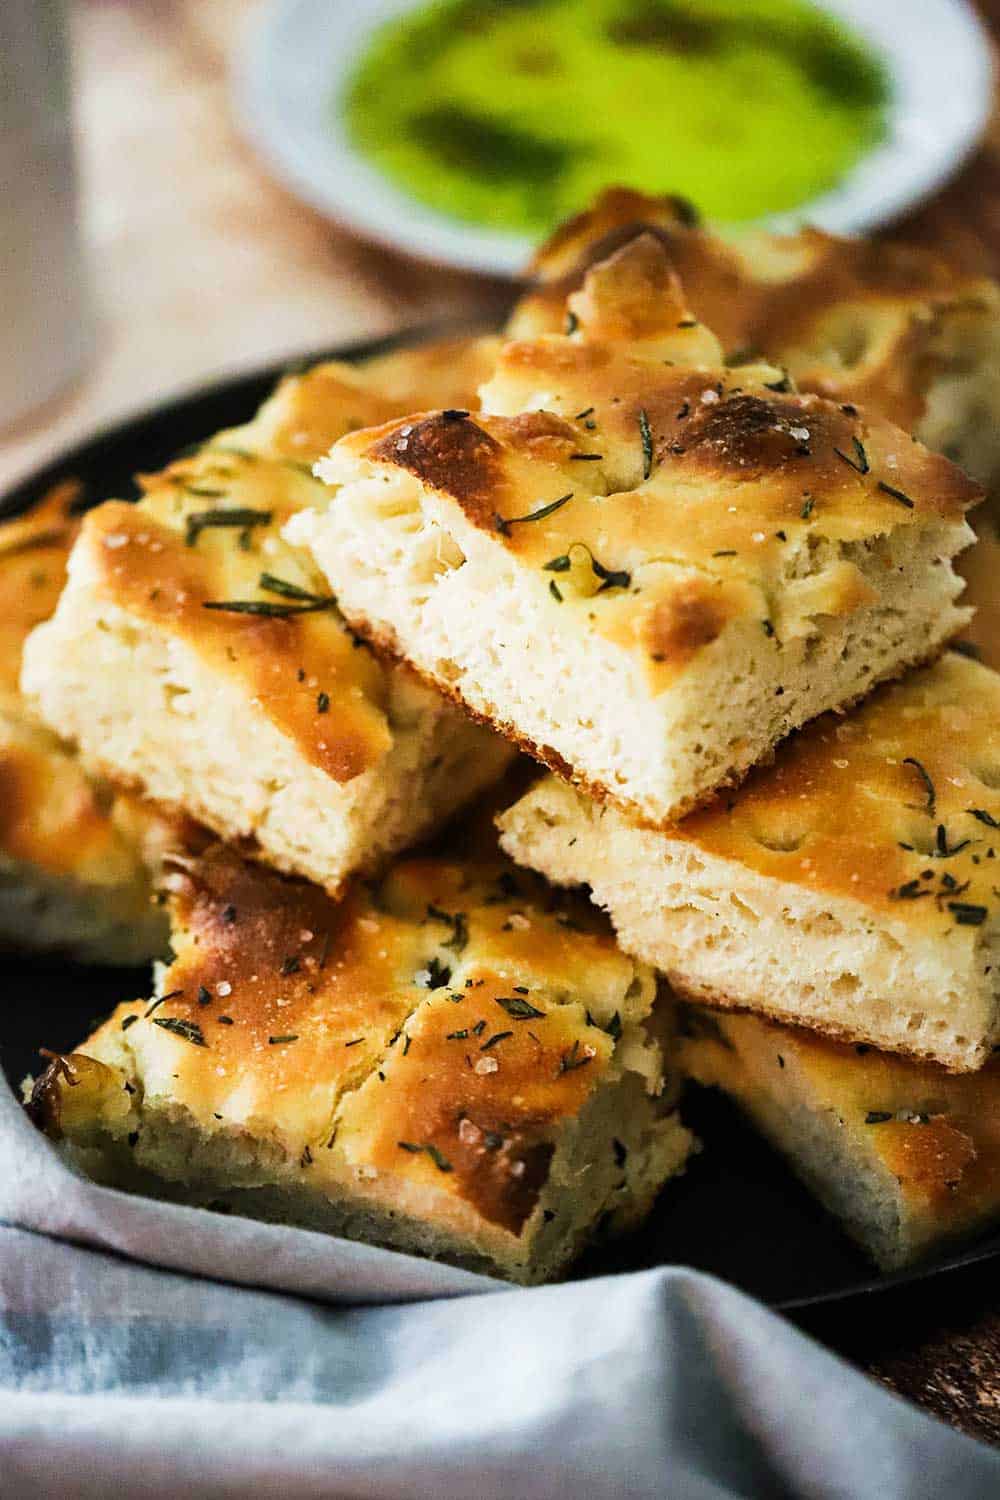
Homemade focaccia with rosemary and olive oil requires a bit of effort, but the incredible payoff is well worth it, resulting in a fragrant and flavorful bread that elevates any meal. This delightful bread pairs perfectly with a holiday feast, complementing dishes like a bourbon-orange glazed ham and French au gratin potatoes for a truly memorable dining experience.

Jump to:
💦 The Ingredients
With just a handful of ingredients, homemade focaccia, when prepared with care, transforms into an unforgettable bread that captivates the palate with its delightful texture and flavor. Find ingredient notes (including substitutions and variations) below.

🧅 Substitutions and Variations
- Flour – Bread flour can be found in the flour section of most well-stocked supermarkets; however, all-purpose flour can be used as a substitute. The rolls may not be as fluffy, but will still be delicious.
- Olive oil – This is a critical ingredient to achieve excellent focaccia. You can use either olive oil or extra-virgin olive oil; just go with a quality brand.
- Toppings – You have many options for toppings. For herbs, we recommend fresh. Wonderful options (in addition to rosemary) are thyme, tarragon, dill, basil, and chives. Caramelized onions, sun-dried tomatoes, olives, and dried fruits are all amazing toppings. Experiment and have fun!
See the recipe card (with video) below for a full list of ingredients and measurements.
Expert Tip
Be sure to check the date on your package of yeast. If the date is no longer in the future, don’t get it. As yeast becomes active, it will start to foam. If this doesn’t happen at all, your yeast may be dead. You can also use Rapid Rise or Instant Yeast. Within 5 to 8 minutes, the yeast should be nice and foamy. If not, you’ll need to get some new yeast.
👩🏼🍳 How To Make Focaccia Dough

- Step 1: In a mixer, beat together flour, water (room temp), and sugar.

- Step 2: Mix until a dough forms and then cover the bowl with a kitchen towel.

- Step 3: In a small bowl, whisk together the warm water, yeast, and remaining sugar

- Step 4: Remove the towel and slowly beat in the yeast mixture

- Step 5: Massage the yeast into the dough with your hands.

- Step 6: Add the salt and beat until the dough becomes elastic and pulls away from the sides of the bowl.
🫓 Preparing the Focaccia for Baking

- Step 7: Add olive oil to a large bowl and scrape the dough into it.

- Step 8: Cover with plastic wrap and allow to proof until doubled in size, then remove the cover.

- Step 9: Deflate the dough and scrape it into an oiled rimmed baking pan (13”x18”)

- Step 5: Stretch the dough and then chill for 2 hours or overnight.

- Step 11: Proof for another hour, then make dimples in the dough with your fingers.

- Step 12: Sprinkle on the rosemary and sea salt.
Expert Tip
Focaccia dough remains quite sticky throughout the process. Don’t let this throw you. Your hands will get a little of the dough stuck to them from time to time. That’s okay. Have a little bowl of olive oil nearby. If you want, rub a little oil on your fingers; this will make working with the dough easier.
🔥 Finishing the Focaccia Bread

- Step 13: Bake for 10 minutes, then brush on more olive oil.

- Step 14: Bake until top is golden.

- Step 15: Rest for 10 minutes on a rack and then brush on more olive oil.

- Step 16: Slice and serve warm or at room temperature.
🧺 How To Serve Focaccia Bread
- Freshly baked focaccia is wonderful when served warm or at room temperature before the main meal.
- You will find the folks love it so much, they’ll enjoy the freshly made bread throughout the evening.
- Just slice it up into squares, set it out on a platter, and watch how quickly it gets gobbled up.
Expert Tip
Up the ante by creating a dipping oil, which is nothing more than good-quality olive oil (or extra-virgin olive oil) with a teaspoon of your favorite dried herbs added in, such as oregano, rosemary, basil, and marjoram. A few pinches of red pepper flakes are great, too. Allow the oil to sit with the herbs for a few hours before serving.
🙋🏽♂️ Frequently Asked Questions
The bread is best when freshly baked, however, it can be prepared a couple of days before serving. Store in an air-tight container in the fridge. Let it come to room temperature before serving.
This bread is delicious at room temperature. If you want to reheat the bread, you can heat it in increments in the microwave, or wrap it in foil and heat in a 250°F oven for 15 to 20 minutes, or until heated through.
Yes. Substitute and gluten-free flour, such as almond flour, rice flour, or oat flour. The texture won’t be quite the same, but it will still be delicious.


Ready to make the best bread in town? Go for it!
And when you do, be sure to take a photo of it, post it on Instagram, and tag @HowToFeedaLoon and hashtag #HowToFeedaLoon!

Focaccia with Rosemary and Olive Oil
Video
Equipment
- Stand mixer with dough attachment
- 18"x13" rimmed baking pan
Ingredients
- 6¼ cups bread flour 1 lb 9 oz
- 2½ cups water room temperature (70 – 74°F), 600 ml
- 3 teaspoon sugar divided
- ½ cup warm water 95 – 103°F, 120 ml
- 2¼ teaspoon active dry yeast 1 package, ¼ oz
- 1 tbsp + 1½ tsp Kosher salt
- ½ cup olive oil plus more, as needed
- 2 tablespoon rosemary fresh, roughly chopped
- 1 tablespoon sea salt coarse, plus more for garnishing
Instructions
- Attach the dough attachment to your stand mixer. In the bowl, beat together (on LOW) the flour, room-temperature water, and 1½ teaspoon sugar until a rough, shaggy dough forms, about 3 minutes. Remove the dough attachment, set it aside (you'll be using it again, soon), and cover the bowl with a kitchen towel and let stand while you prepare the yeast mixture.
- In a small bowl, add the warm water. Whisk in the yeast and the remaining 1½ teaspoon of sugar. Let stand until foamy, about 8 – 10 minutes.
- Take the towel from the mixer. Re-attach the dough attachment. With the mixer on LOW, add the yeast mixture a little at a time until it's all been added. Stop the mixer, remove the attachment (keep it handy, though), and massage the liquid from the yeast mixture into the dough. Don't worry if it doesn't get 100% incorporated. The dough will be very wet.
- Re-attach the dough attachment and sprinkle in the Kosher salt (1 tablespoon plus 1½ tsp). Turn the mixer on MEDIUM speed and beat until the dough is elastic, sticky, and pulls away from the sides of the bowl, about 5 minutes.
- Add 3 tablespoon of olive oil to a large bowl. Swish the oil around to coat the sides. Lightly oil your hands, and scrape the dough from the mixer bowl into the oiled bowl. Loosely cover with plastic wrap and place in a warm, non-drafty area until doubled in size, about 2½ hours.
- Add another couple of tablespoons of olive oil to an 18"x13" rimmed baking pan.
- Take the plastic off of the dough and gently use your hands to deflate the dough. Scrape the dough onto the oiled pan. Use your fingers to stretch the dough toward the edges of the pan. Most likely, the dough will want to pull back to the center. If so, cover with a couple of pieces of plastic wrap and allow the dough to rest for 10 minutes. Remove the plastic and try again. If the dough doesn't completely reach the corners, this is fine. Cover with plastic wrap and place the pan in the refrigerator for 2 hours, or overnight.
- Remove the pan from the refrigerator and place it back in the warm, non-drafty area for 1 hour.
- Preheat your oven to 450°F.
- Remove the plastic. Dip your fingers in a little bowl of olive oil, and then press your fingertips firmly into the dough to make deep dimples all over the dough.
- Sprinkle on the chopped rosemary and sea salt.
- Place in the oven. After 10 minutes, drizzle 2 more tablespoons of olive oil all over the surface, and then rotate the pan 180°. Bake for another 10 minutes, or until the top is golden brown.
- Place the pan on a baking rack and let cool for at least 10 minutes. Brush the surface of the focaccia with a little more olive oil. Cut into slices and serve warm or at room temperature.
Notes
Nutrition
POST UPDATE: This post was originally published in June 2014, but was updated with a recipe adapted from the amazing cookbook from Williams-Sonoma called Baking Favorites.


Dave Z says
I just love this recipe, takes a little time but well worth the wait. Definitely will be making this again.
Thanks
Kris Longwell says
Hi Dave! It is a bit of a labor of love, but we agree…the end result is just incredible! We are so glad you had success with the recipe and let us know. We appreciate that so so much!! All the best, Kris & Wesley
Kit says
Just made it…delicious! Long process but so worth the wait!
Kris Longwell says
Hi Kit! Homemade focaccia is definitely a labor of love, but we agree that it’s so worth it! We are thrilled you had such great success with the recipe! And thank you so much for letting us know and for the wonderful review! That means the world to us!! All the best, Kris & Wesley
carol abrams says
Tried this today, a little worried about the consistency of the dough, but it turned out perfectly, now just have to share it with my neighbours as there is no way I can eat it all.
I know they will love it.
thanks again Guys for another great recipe
Kris Longwell says
Hi Carol!! So sorry for the delayed response but we are THRILLED the focaccia ending being a success for you!! The dough at the beginning does feel a bit strange…but it all works out in the end! Thank you for letting us know and for the wonderful review! That means the world to us!! All the best, Kris & Wesley
Amy says
Made it last night and it was indeed fantastic!
Marilyn says
Delicious!