

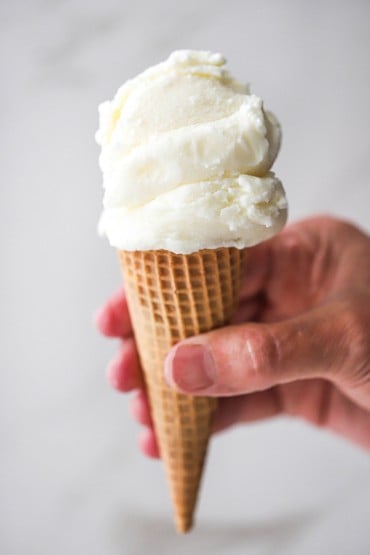
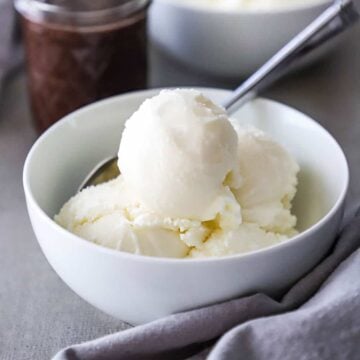
If you’re looking for a dessert that will thrill not only the kids but also every single adult within earshot range, this is the one.
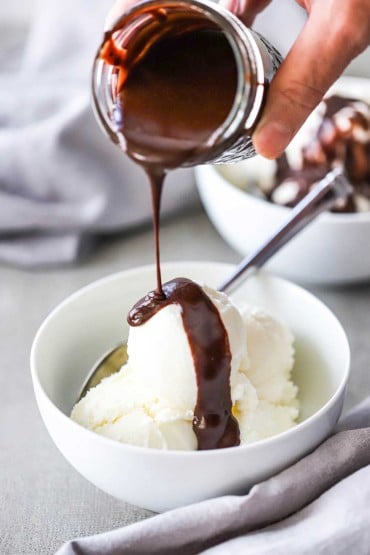
There is something magical about this amazing frozen dessert. This particular recipe is how we remember enjoying home-churned ice cream as kids: light, sweet, and the epitome of summertime goodness. The homemade chocolate sauce puts it over the top.
How To Make Homemade Vanilla Ice Cream
All you need are a few essential tools and a handful of ingredients to make one of the most beloved desserts of all time.
Give yourself enough time to chill the cream and then for freezing after the churning. Trust us, the wait is well worth it.
NOTE: If you liked this video, please subscribe to our YouTube channel. Remember to click the little ‘bell’ icon so you’ll never miss a new video! Thank you!
The Tools and Ingredients You Will Need
As mentioned, there is a small list for ingredients with the type of ice cream. Another popular type of ice cream is made with a custard base. This version is actually often referred to as Philadelphia-Style.
The Equipment You Will Need
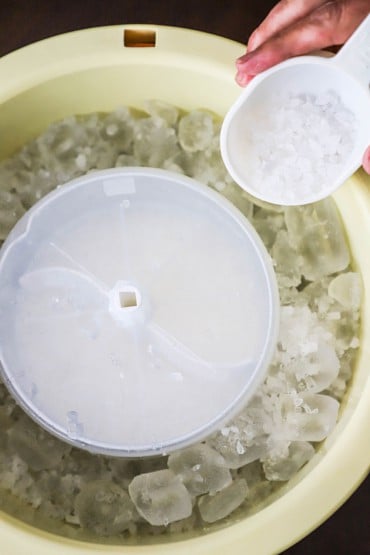
Ice Cream Maker – Our recipe is for 1 gallon (4 quarts). We use the Nostalgia Electric Ice Cream Maker, and absolutely love it.
The Ingredients You Will Need
Heavy Cream – Can also use whipping cream or double cream
Milk – We recommend whole milk. Half and half works great, as well.
Sugar – Granulated
Vanilla Extract – This provides the key flavoring, go with good-quality, if possible.
Ice – Broken into small chunks (bagged ice works just fine).
Rock Salt – If you can’t find this, go with coarse sea salt.
EXPERT TIP: The rock salt brings the temperature of the canister churning against the ice below freezing. You want to use enough rock salt so the freezing will occur, but if you add too much, it will freeze too quickly and be grainy. See the NOTES for recommended quantities for both ice and salt.
Tips for Perfect Homemade Vanilla Ice Cream
Use Top-Notch Ingredients – Since there are only a few ingredients, go with the best you can get, including fresh cream, whole milk, and pure vanilla extract.
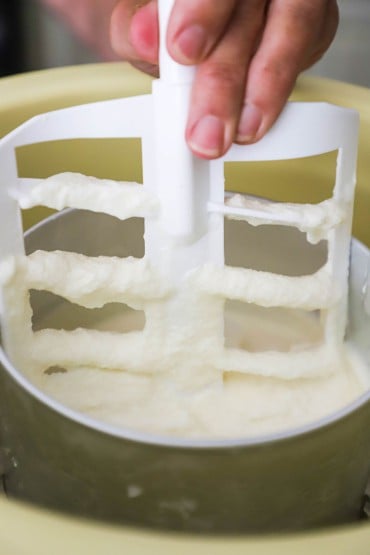
Chill Cream Mixture and Freeze Canister – Don’t skip this step. Although your cream mixture will be chilled already, allowing it to chill in the fridge for an hour helps in the freezing process. A cold canister is important, too.
Follow the Manufacturer’s Instructions – Check the size of your canister and be sure to read the instructions. Don’t overfill the canister. Also, see NOTES for recommended quantities for ice and rock salt.
EXPERT TIP: Though the mixture will be tasty when the machine has churned for around 30 minutes, you’ll want to freeze until solid (3 to 4 hours). After 30 minutes, the mixture will seem a bit slushy. This is normal and will freeze beautifully.
How To Serve
As a kid, we remember the canister with the partially frozen ice cream always going directly into the freezer to finish freezing. You can also transfer to containers to freeze. We love our ice-cream freezer containers! These are ideal for storing and for whipping up another batch of ice cream with your beloved machine!
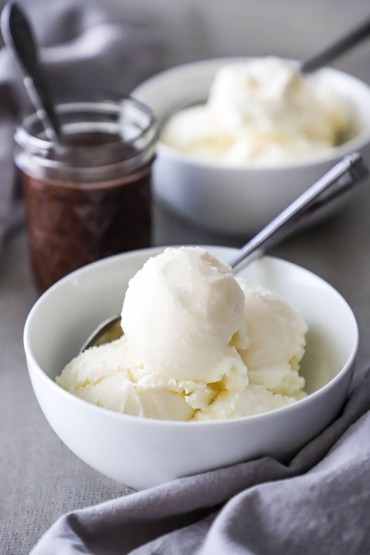
When serving, we recommend letting the ice cream sit on the counter for 10 to 20 minutes in order to thaw, or, you can place it in the refrigerator for 30 minutes.
Place your scoop in a glass of cool water before scooping the ice cream. This makes it easier for the ice cream to slip right off the scooper.
Other Amazing Homemade Ice Cream Recipes to Try
We love all kinds of ice cream. Vanilla is always a favorite. But, these other flavors are irresistibly scrumptious, too! You’ll want to try them all!
Strawberry Ice Cream
Creamy Salted Caramel Ice Cream
S’Mores Ice Cream
Blueberry Ice Cream
Peanut Butter Cup Ice Cream
These are all great, and we’ve got even more new recipes on the way! In the meantime, how can you possibly go wrong with a delicious bowl of homemade vanilla ice cream? Yum!
This ice cream is amazing on its own, but wait until you drizzle homemade chocolate sauce and/or warm caramel sauce over the top!
This ice cream conjure amazing memories from our childhoods.
There was (and is) nothing much more exciting, especially on those hot summer days, than to hear the churning of the ice cream maker, knowing what deliciousness was soon to come.
And talk about the perfect topping to pie, cobbler, or cake. This homemade peach pie got even better with a big scoop of vanilla ice cream on top. Dessert perfection!

Ready to make the best frozen sweet treat in town? Go for it!
And when you do, be sure to take a photo, post it on Instagram, and tag @HowToFeedaLoon and hashtag #HowToFeedaLoon!
Homemade Vanilla Ice Cream
Video
Equipment
- 1 4-quart ice cream maker
Ingredients
- 6 cups heavy cream
- 4½ cups whole milk
- 2¼ cups sugar
- 1½ tablespoon vanilla extract
- Ice See NOTES
- Rock salt See NOTES
- chocolate sauce (optional)
Instructions
- Place the canister in the freezer.
- In a large bowl, whisk together the cream, milk, sugar, and vanilla. Whisk until sugar is dissolved. Place in the refrigerator for 30 minutes (or up to overnight).
- Remove the canister from the freezer, and ladle the cream mixture into the canister (you'll probably want to whisk the cream mixture before doing this to help make sure most of the sugar is dissolved).
- Freeze according to manufacturers' instructions. See NOTES.
- Once the cream mixture is thick, remove and freeze until solid, 3 to 4 hours, or overnight. Allow to thaw for about 10 to 20 minutes before serving.

papa's games says
I love eating ice cream on rainy days great.
Kris Longwell says
Us too!
Lynn says
I made the vanilla ice cream and the chocolate sauce today, both were delicious! I enjoy watching your videos!
Kris Longwell says
Hi Lynn! Yay!!! The perfect summer sweet treat! We are thrilled you made both the ice cream and the chocolate sauce! Thank you so so much for sharing and for the great review! That means the world to us!! Please stay in touch! All the best, Kris & Wesley
driving directions says
The rock salt plays a crucial role in freezing the ice cream.
Kris Longwell says
Indeed!
Danny Jones says
The best
Kris Longwell says
Thank you, Danny! And we agree…nothing much better than homemade vanilla ice cream!! Stay in touch!
Donna says
Hey there!
If I cut this in half, once it’s mixed can I just freeze it in a loaf pan?
Kris Longwell says
Hi Donna! You can definitely cut the recipe in half. Churn in your ice cream maker, as directed, and then transfer to your loaf pan and add to the freezer. Probably would be a good idea to cover to prevent freezer burn! Let us know if you make it and how it turns out!