


If you are a fan of pizza (and who isn’t), you need to prepare yourself for this one.
Detroit is a U.S. city known for automobiles, Motown, wonderful people, and now: Pizza! This style of pizza has been popular in Detroit for decades, but somehow, it stayed somewhat of a secret. That is until recent years. Once you taste it, you’ll wonder why it’s not the most famous pizza in the world. It’s really that good.
How To Make Homemade Detroit-Style Pizza
Similar to the strict guidelines for making authentic Neapolitan pizza, there are some pretty solid rules to follow when attempting to make authentic Detroit-style pizza.
We studied the masters for making this kind of pizza, including the award-winning Peter Reinhart, and put together a recipe that produces one of the best (if not the best) pizzas we’ve ever made, served, or consumed.
NOTE: If you liked this video, please subscribe to our YouTube channel. Remember to click the little ‘bell’ icon so you’ll never miss a new video!
The Ingredients and Tools You Will Need
It’s important to remember the most important parts of this pizza are the cheese and the dough. Everything else is important, but you need to get these two components right. To make it truly authentic, you may need to order a few items online.
Here’s What To Have on Hand</h4)
For the Dough:
Flour – This is important. You need to use unbleached bread flour, not all-purpose or even Italian ‘OO’
Salt – Kosher
Yeast – We use Instant, or Rapid-Rise
Water – It needs to be cool, 75 to 80°F
Olive oil – You’ll need to have plenty on hand, you’ll see why
The Pizza Ingredients:
Cheese – Brick is traditional, but a combination of Monterey Jack and Mozzarella will work, too. Cut them into small ¼-inch cubes
Pepperoni – We love to get Boar’s head natural-casing pepperoni and slice it into ¼-inch rounds.
For the Sauce:
Oil – Olive oil, or butter
Garlic – Minced
Tomatoes – Crushed, be sure to go with a top-notch variety
Seasonings – Dried oregano, basil, salt, pepper, and red pepper flakes
Vinegar – Red wine
The Tools:
Pan – Traditional is a steel (blue steel) pre-seasoned 10×14″ pan. We got ours from DetroitStylePizza.com. You can also use a 9×9″inch metal baking dish, or even a 9-inch round metal cake pan.
Bench scraper – This is very helpful in helping you work the dough without over-handling it. It’s also helpful in getting the pizza out of the pan after it bakes. A metal spatula will help, too.
Stand mixer – This makes it easy to bring the dough together, but a bowl with a wooden spoon and your oiled hand will work just fine, too.
EXPERT TIP: The dough will be very sticky. It’s important to keep your hands oiled. As you dimple, stretch, and fold, the dough will relax and the gluten will get to work.
Tips for Making Authentic Detroit-Style Pizza
Use a Deep Dish Pan: This pizza is known for its thick, crispy crust and deep dish pan. Use a square or rectangular pan that is at least 2 inches deep to achieve the signature crust. Take note in the recipe (and in the Notes) of how much dough and cheese you’ll need to use for each sized pan.
Let the Dough Rise Properly: The dough is a crucial component of this pizza. Let the dough proof in the refrigerator for 12 to 72 hours first, and then let it proof in the pan for at least 2 hours before baking to achieve a light and airy texture. And only use bread flour.
Use the Right Cheese: It is traditionally made with Wisconsin brick cheese, which has a mild flavor and melts easily. You can also use a combination of mozzarella and cheddar cheese for a similar flavor.
Add Toppings Carefully: Add half of the dough before it proofs. Then add the rest of the cheese and toppings. Make sure you’ve got cheese along the edges of the dough and pan because this will create the classic caramelization.

How To Remove the Pizza From the Pan
Before you bake the pizza, be sure you have liberally oiled the bottom of the pan and the sides. The dough will seem oil, but it will bake into the dough as it cooks and prevent the dough from sticking to the pan.
Once you remove the pizza from the oven, use a kitchen towel to hold the pan in place and carefully run a sharp knife around all four edges of the pan.
Next, use your bench scraper, or a large thin metal spatula, to fully separate the pan from the sides of the pan.
Carefully work two large metal spatulas under the pizza to free it from the bottom. This may take a little maneuvering. Now, use both spatulas to carefully lift the pizza from the pan. Don’t worry, the crust is solid and should not break apart.
How To Serve
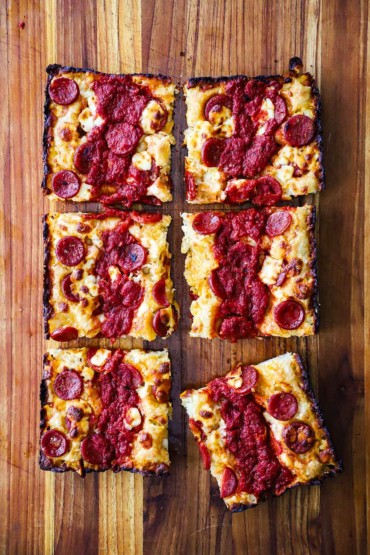
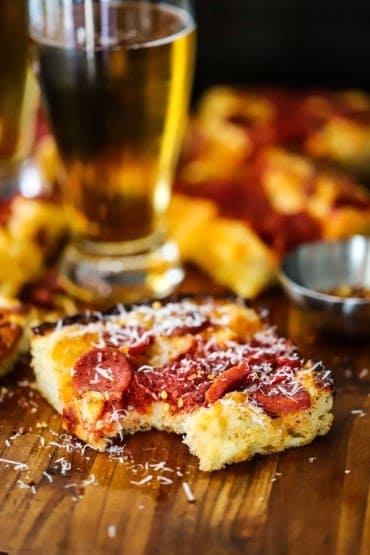
A 10×14-inch pizza is typically cut into 6 pieces. This is traditionally referred to as a “4-corner” pizza.
When serving to a crowd, you could easily cut it into 12 pieces.
A pizza cutter works just fine, but find using a large sharp knife works best for cutting cleanly through the crust.
The pizza is definitely best served piping hot right out of the oven.
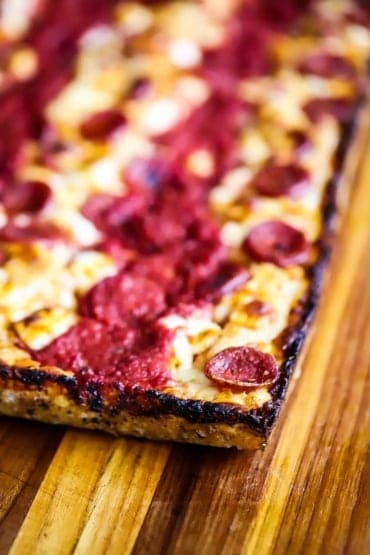
This pizza is so good mainly because of the crust.
It’s basically bread that has been lightly fried in the pan.
Adding half of the cheese into the dough before it rises ensure you’ll get the most buttery, insanely delicious crust in the world. Truly spectacular.

Other Homemade Pizza Recipes to Try
It is unlikely that we ever met a pizza that we didn’t like. Here are some of our favorite pizza recipes that you will most likely love, too.
Chicago-Style Deep Dish Pizza
Thin-Crust Pizza with Soppressata, Mushrooms, and Black Olives,
BLT Pizza with Pesto Sauce
Deep Dish Pizza with Sausage and Spinach
Grilled Pulled Pork Pizza with BBQ Sauce
BBQ Chicken Pizza
Grilled Portabella BLT “Pizzas”
These are all extremely delicious pizzas, but, folks, isn’t this Detroit-style pizza calling your name right now?

Folks, if you’re like us, you’ve eaten a lot of pizza throughout your life.
Like so many things in life, some pizzas are better than others.
This pizza right here, is in the running to be the absolute best pizza of them all. Wait until you try it.
Every time we serve this, our guests can’t stop raving about it. It goes in minutes.
Ready to make the best pizza this side of, well, Detroit? Go for it!
And when you do, be sure to take a photo of it, post it on Instagram, and tag @HowToFeedaLoon and hashtag #HowToFeedaLoon!

Homemade Detroit-Style Pizza
Video
Equipment
- Stand mixer Or bowl with a wooden spoon
- 2 9x14 steel pans See NOTES
- Bench scraper Or spatula
- 2 metal spatulas
Ingredients
For the Dough
- 4½ cups unbleached bread flour
- 1¾ teaspoon Kosher salt
- 1¼ teaspoon Instant yeast
- 2 cups water cool, 75 to 85°F
- 2 tablespoon olive oil plus more for stretching
For the Sauce
- 2 tablespoon olive oil
- 3 cloves garlic minced
- 2 teaspoon oregano dried
- ¼ teaspoon red pepper flakes
- 1 28 oz can crushed tomatoes
- 1 teaspoon onion powder
- 1 teaspoon garlic powder
- 1 tablespoon sugar
- ½ teaspoon Kosher salt
Finishing the Pizza
- 12 oz brick cheese cut into ¼-inch cubes, See NOTES
- 1 cup pepperoni sliced
- ½ cup Romano cheese grated, optional
Instructions
Make the Dough (In Advance)
- In the bowl of a stand mixer (or in a large bowl), use the paddle attachment to combine the flour, salt, and yeast.4½ cups unbleached bread flour, 1¾ teaspoon Kosher salt, 1¼ teaspoon Instant yeast
- Pour in the water and turn your mixer on low for 30 seconds (or use a wooden spoon to incorporate the water into the flour mixture in a bowl). The dough will be very wet and shaggy (not forming a ball).2 cups water
- Add 2 tablespoon of olive oil and turn the mixer on medium-low for another 30 seconds (or mix thoroughly with a wooden spoon). Let the dough rest for 5 minutes. Increase the mixer speed to medium and mix for another 45 seconds. The dough will still be very sticky.2 tablespoon olive oil
- Spread about 1 to 2 tablespoon of olive oil on a smooth surface. Oil your fingers and a bench scraper (or metal spatula) and remove the dough from the bowl and place on the oiled surface. Use your fingers to flatten the dough into a rough rectangle. Cover the dough with a kitchen towel and let is rest for 5 minutes.
- Use an oiled bench scraper and your oiled fingers to bring the right side of the dough over to the center of the dough. Do the same with the left side, and then bring the lower half up, and then the upper half. Flatten again to another rectangle. Cover with a kitchen towel and let rest for another 5 minutes. Repeat this process 3 more times. (See Video for reference).
- Pick the dough up and form it into a ball. Place in an oiled bowl and cover with plastic wrap. Place in the refrigerator for 12 to 72 hours.
- 4 hours before baking, you'll need to remove the dough from the refrigerator.
- Add 2 tablespoon of oil to your pan(s) and use your fingers to rub it all over the bottom of the pan and the sides, too.
- If using two 10x14" pans, you'll need to split the dough in half. If using just one 10x14" pan, you'll need 1 lb of dough. If using a 9x9" pan, you'll need 12" of dough. Any leftover dough can be kept covered in the fridge for another 24 hours, or can be frozen for up to 2 months.
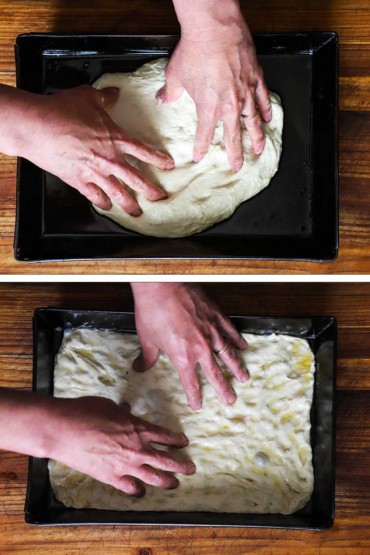
- Place the dough in the oiled pan and use your fingers to dimple the dough. Working from the center, begin to gently stretch the dough toward the sides of the pan. It won't reach the sides, but that's normal. Cover the pan with a kitchen towel, and let rest for 20 minutes. Repeat the process 2 or 3 more times. With each stretching, the dough will get closer to the sides of the pan, until it finally does extend to the edges.
- Gently place half of the cubed cheese in the dough. Cover with plastic wrap and allow the dough to proof in a warm, non-drafty area for 2 to 3 hours until it has risen about ⅓ of the way up the sides of the pan. Now it's time to make the sauce.12 oz brick cheese
Make the Sauce
- Heat the oil in a medium-sized saucepan over medium heat. Stir in the garlic, oregano, and red pepper flakes. Stirring often, sauté for about 30 seconds. Add the tomatoes, onion powder, garlic powder, sugar, and salt. Simmer for 30 minutes, stirring occasionally. Remove from heat and let completely cool.2 tablespoon olive oil, 3 cloves garlic, 2 teaspoon oregano, ¼ teaspoon red pepper flakes, 1 28 oz can crushed tomatoes, 1 teaspoon onion powder, 1 teaspoon garlic powder, 1 tablespoon sugar, ½ teaspoon Kosher salt
Finish the Pizza
- Add a pizza stone to your oven and preheat your oven to 500°F. Do this about 30 minutes before baking.
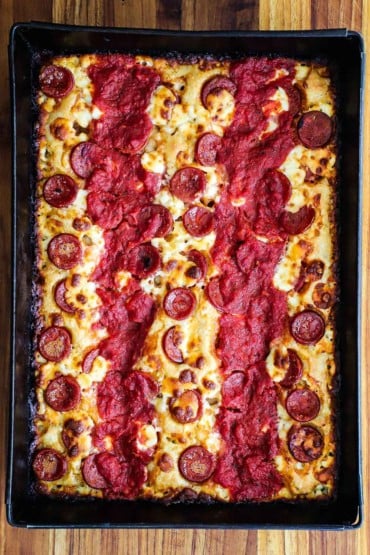
- Place half of the pepperoni on the top of the dough. Add the rest of the cheese, making sure to place the cubes of cheese along the edge where the dough meets the sides of the pan. (this causes the classic dark caramelization).1 cup pepperoni
- Use a spoon or small ladle to add two or three "stripes" of sauce down the top of the pizza, lengthwise.
- Place the pan on the pizza stone and bake for 8 minutes. Turn the pan, and bake for another 8 to 9 minutes, until bubbly and lightly browned on top. If desired, in the last two minutes, you can place the pan directly on the bottom of the oven, but be careful, don't let it burn!
- Remove the pizza from the oven. Use a sharp knife to pry the edges of the pizza away from the sides. Then, use a bench scraper or metal spatula to completely free the pizza along the sides. Carefully use one or two spatulas to work under the pizza to free it from the bottom of the pan. Use two spatulas to lift the pizza from the pan. Place on a large cutting board.
- Use a large knife, or pizza cutter, to cut the pizza into 6 squares (if using a 10x14" pan). Serve at once with grated Romano on the side, if desired.½ cup Romano cheese
Notes
Nutrition
NOTE: Much of this recipe is adapted from Peter Reinhart’s Perfect Pan Pizza book.


MerryChristmas Claus says
Yep. That is Detroit-style pizza. Created, no matter what anyone says, by Buscemi’s which became Buscemi’s Pizza with several locations. I lived in Detroit and the surrounding “East-side” suburbs for 50 years and I know there are three things you can only get in Detroit area: Great Pizza, Coney Islands, ABC (Chinese) Almond Boneless Chicken served with fried rice and an egg roll.
I now live in New Mexico because the weather is great but the food does not compare to what I am used to in both Detroit and Omaha, NE. I so appreciate your website because your recipes are exactly what I miss the most. Thanks!
Kris Longwell says
We can’t even begin to express how happy this makes us! Maybe you could make your own authentic Detroit-style pizza and serve it to your NM friends!!! Thank you so much for sharing and for the great review. That honestly means the world to us!!! Kris & Wesley
Jane says
I think you meant add half the cubed cheese (instead of dough) on the dough in step 11 and also in the notes about adding the topping?
And why do you add half the cheese while proofing, instead of adding all at the end?
Kris Longwell says
Thanks, Jane! You are indeed right! We add half of the cheese during the proofing process in the pan. The dough literally envelopes the cheese. Then top of it with the remaining cheese before baking. The cheese melts into the dough, making it the most buttery, delicious crust we’ve ever had! We hope you try it and if you do, please let us know what you think! All the best, Kris & Wesley