

Everyone loves a classic, right? Well, it doesn’t get much more classic than this amazing appetizer.
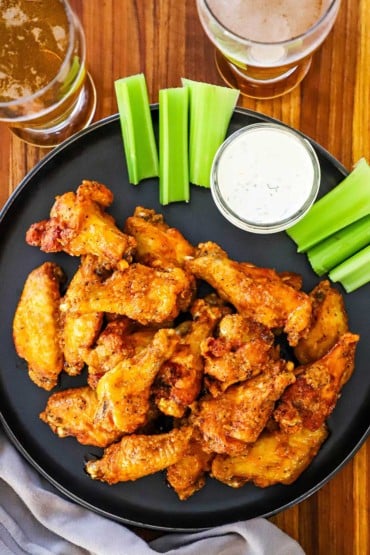
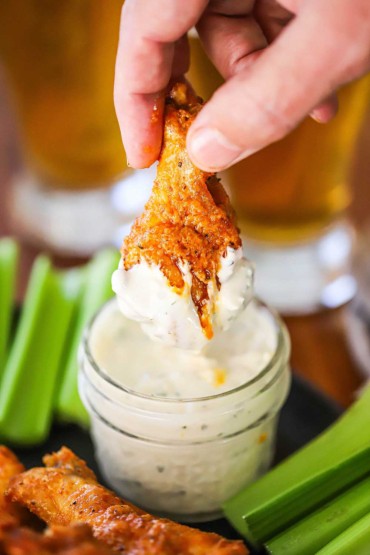
Talk about the classic of all classic appetizers. These “no-frills” wings are truly the real deal and what started our love affair with chicken wings. Serve with fresh celery sticks and homemade blue cheese dressing, and be ready to be very popular with your guests.
VIDEO ALERT: Be sure to check out the video for this recipe in the recipe card. If you like the video, subscribe to our YouTube Channel!
How To Make Classic Buffalo Wings
NOTE: If you like this video, please subscribe to our YouTube channel. Remember to click the little ‘bell’ icon so you’ll never miss a new video. Thank you!
The Ingredients You Will Need
These are the wings that started it all. There’s nothing exotic about them at all and most of the ingredients you might already have. Here’s what you’ll need to have on hand:
Chicken wings – Look for drumettes and flat (wingettes) in the chicken section of the meat department. They are sometimes called “party wings.” If you can only find full wings, see NOTES the recipe card.
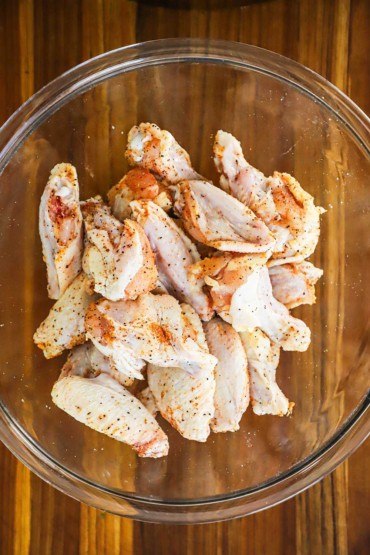
Seasonings – Salt, pepper, smoked paprika, cayenne pepper, onion powder, and garlic powder.
Butter – Unsalted.
Cayenne pepper hot sauce – Frank’s is our favorite.
Blue cheese dressing – For serving, a must for keeping it classic.
Celery pieces – For serving, another must for keeping it classic.
EXPERT TIP: Some folks like to dredge the wings in flour before frying them up. This makes the wings extra crispy, but, just know that this is how the classic version is prepared. Keep it simple by just tossing with the seasonings and then frying them up.
Tips for Classic Buffalo Wings
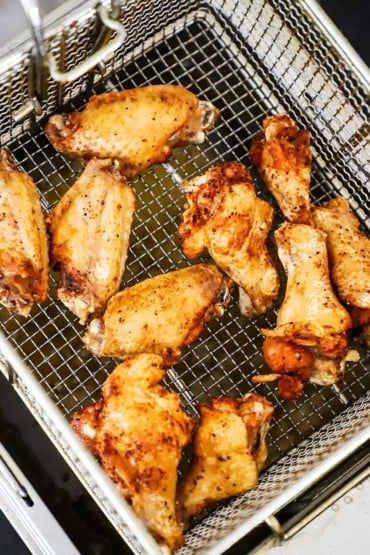
Fry ‘Em Up – While baking the wings, or even air-frying the wings is a much healthier option, if you want authentic tasting Buffalo wings, you’ll want to deep fry them until super crispy, about 11 minutes.
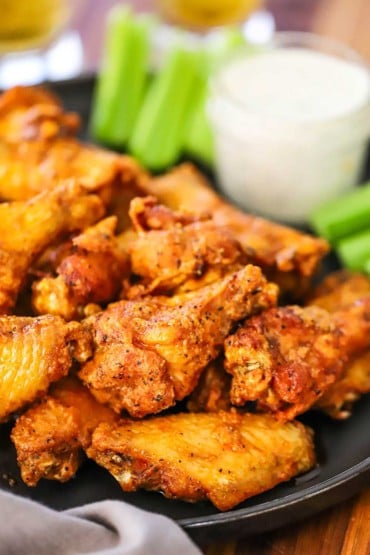
Don’t Sauce Until Ready To Serve – These wings are best served piping hot and tossed in the Buffalo sauce just before serving. If they sit in the sauce too long, they’ll lose their crispiness and the sauce will be absorbed.
Make the Blue Cheese Dressing – To make these truly classic, you must serve them with blue cheese dressing. Making it from scratch is easy and puts the wings over the top. We didn’t tell you this, but they are tasty with Ranch, too.
EXPERT TIP: If you don’t have a deep-fryer, a large sturdy pot, or cast-iron skillet, will work filled with vegetable oil. Use a candy thermometer to maintain an oil temperature of 350°F. Fry in batches, and if you need to keep the wings warm after frying, simply place them on a baking sheet lined with a baking rack in a low-temp oven: 220°F.
How To Serve
We’ve mentioned that if you’re going to keep it classic, you need to serve these wings with blue cheese dressing and pieces of fresh celery.
We pile the wings on a platter or wooden cutting board covered with brown paper (cut from a grocery store paper bag) and then provide several small jars of the dressing. Include spoons with the dressing so guests can add to their wings without double-dipping.
And though these are excellent (and addictive) at room temperature, they are really at their best when they are served piping hot with a fresh layer of sauce on the wings.

Other Amazing Chicken Wing Recipes to Try
These classic wings are about as good as they come. But, folks, these other recipes are true game-changers in their own right. We’re sure you will love them as much as we do!
Grilled Buffalo Wings
Italian-Style Chicken Wings with Gorgonzola Dipping Sauce
Garlic Parmesan Chicken Wings
Grilled Curry Chicken Wings
Teriyaki Chicken Wings
Bourbon Maple Chicken Wings
And for something different but still in the Buffalo culinary vein, you and your guests will love our Grilled Buffalo Shrimp!
Again, these are all truly amazingly delicious wings. But, folks, isn’t this classic version calling your name right about now?
You just can’t go wrong with the wing that started it all.
It is simple, straightforward, and absolutely delicious.
And don’t forget, the homemade blue cheese dressing brings it all together!
Ready to make the best Buffalo wings this side of Buffalo? Go for it!
And when you do, be sure to take a picture of them, post it 0n Instagram, and tag @HowToFeedaLoon and hashtag #HowToeFedaLoon

Classic Buffalo Wings
Video
Equipment
- Deep fryer, or sturdy pot with a candy thermometer
Ingredients
- Vegetable oil for frying
- 2 lbs chicken wings drumettes and wing flats
For the Rub
- 1 teaspoon Kosher salt I like Kosher
- ½ teaspoon black pepper divided
- ½ teaspoon garlic powder
- ½ teaspoon smoked paprika
- ½ teaspoon cayenne pepper
For the Sauce
- ⅓ cup unsalted butter
- ⅓ cup hot sauce i.e., Franks
- ½ teaspoon garlic powder
- ¼ teaspoon Kosher salt
- ¼ teaspoon black pepper
For Serving
- Blue cheese dressing for dipping
- Celery cut into strips
Instructions
- Heat the oil in a large skillet (about 1-inch deep) or a deep fryer, to 350° to 360° F.
- In a small bowl, mix together the rub ingredients.
- Place the wings into a large bowl and then sprinkle the rub mixture over them, tossing the wings with a large spoon, making sure the wings are fully coated.
- In a separate small saucepan, combine the butter, hot sauce, garlic powder, salt, and ground pepper over low heat. Stir until the butter has melted and the ingredients are well blended.
- Carefully place the wings into the hot oil and fry them for 10 to 11 minutes, or until they are crispy and golden. You will probably need to do this in batches.
- Remove the wings to a plate with lined paper towels to drain.
- Add the cooked wings to a large bowl. Add the prepared wing sauce, and gently stir, coating all the wings evenly.
- Place on your serving platter along with homemade blue dressing and cut celery. Serve at once!
Notes
Nutrition
POST UPDATE: The recipe was originally published in November 2014, but was updated with improved tweaks to the recipe with new photography, tips, and a fabulous new video in September 2023.


Bella says
5 stars alone for getting it AUTHENTICALLY CORRECT with blue cheese and not nasty ranch! The only place ranch belongs is in the trash (along with any food you disgrace it with)
KJ says
Great!
Kris Longwell says
Woo hoo!! Thank you for letting us know!!! xoxo
Michael says
They were amazing perfect Halftime show snack! Thanks
Kris Longwell says
AWESOME!!!!!
Kathy says
My son found this recipe and we made these wonderful wings for Superbowl Sunday. They are the best ever!
These will now always be our go to wings. Hard to beat perfect! Thanks so much! Your site has so many enticing recipes, can’t wait to try another one!
Maybe Cajun shrimp with cheesey grits?!
Kris Longwell says
Hi Kathy! Big High-5 to your son! And so glad you guys enjoyed them! We love ’em so much, too!! And thank you so much for letting us know! And yep, Cajun Shrimp with Cheesy Grits is a winner!! Stay in touch!!
GinaKay Rickard says
How do you think these would turn out in an air fryer?
Kris Longwell says
They would be GREAT!! Cook them the way you normally would cook the chicken in the air fryer, and then toss in the wings sauce. Let us know how it turns out! Best, Kris & Wesley