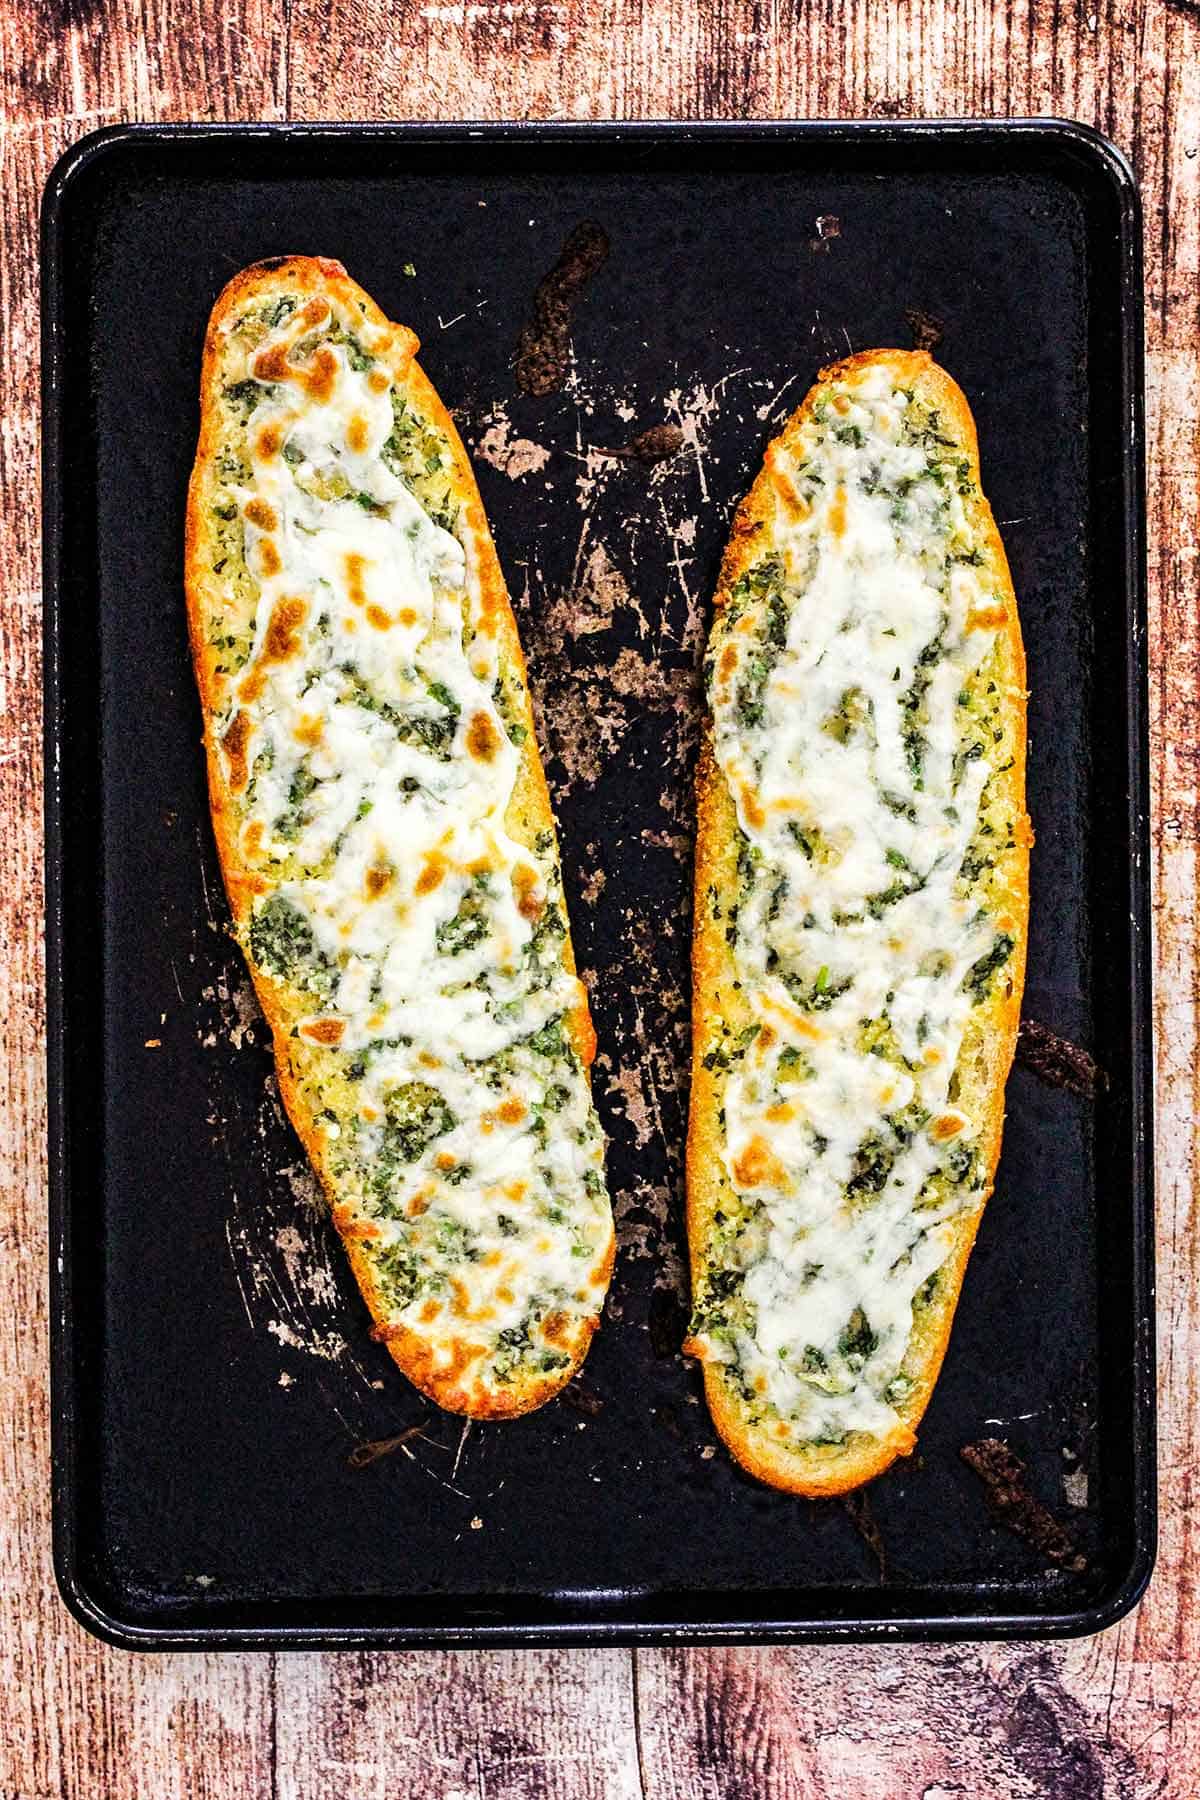
This Cheesy Garlic Bread elevates a classic side dish by using a whole head of mellow, roasted garlic and a fragrant blend of fresh basil and chives. The savory garlic herb butter is spread onto a crusty Italian loaf and topped with a generous layer of shredded mozzarella for maximum meltiness. Baked until perfectly golden and bubbly, it’s the ultimate crowd-pleasing accompaniment to any meal.
Jump to:
🥖 The Ingredients
This recipe pairs slow-roasted aromatics and vibrant garden herbs with a decadent blend of cheeses for a truly elevated flavor profile. Find ingredient notes (including substitutions and variations) below.

📝 Ingredient Notes and Substitutions
- Garlic: Roasting a whole head of garlic creates a sweet, mellow flavor that is much less pungent than raw garlic; if you are in a rush, you can substitute with 1 tablespoon of minced fresh garlic or 1 teaspoon of garlic powder.
- Italian Bread: A standard Italian loaf offers the perfect balance of a soft crumb and a thin, crispy crust, but you can also use French bread, a wide baguette, or even a sourdough loaf for a tangier profile.
- Whole Milk Mozzarella: Using whole milk mozzarella ensures a superior melt and a richer flavor, though part-skim mozzarella or a blend of Provolone and Monterey Jack can be used as alternatives.
- Fresh Herbs: Fresh basil and chives provide a bright, garden-fresh aroma; if you must use dried herbs, reduce the quantity to about one-third of the amount called for in the recipe.
- Unsalted Butter: This allows you to control the saltiness of the spread, but if you only have salted butter available, simply omit the additional salt from the mixture.
Refer to the recipe card (with video) below for a full list of ingredients and measurements.
🔥 Tips and Tricks for Perfect Garlic Bread
- Freshly Shred the Cheese: For the best melt and “cheese pull,” buy a block of whole milk mozzarella and shred it yourself; pre-shredded cheeses are coated in potato starch to prevent clumping, which can lead to a grainier texture.
- Roast Garlic in Advance: You can roast the garlic up to three days ahead of time and keep it in the fridge, which makes the final assembly of the bread incredibly fast and easy.
- Don’t Over-Mix the Herbs: Stir the fresh basil and chives into the butter mixture gently at the very end to prevent them from bruising or turning the butter green.
- Watch the Broiler: If you prefer a deeply browned, bubbly top, switch your oven to “broil” for the last 60 seconds of cooking, but stay close—it can go from golden to burnt very quickly!
- Softened Butter is Key: Ensure your butter is truly at room temperature before mixing; if it’s too cold, the roasted garlic won’t incorporate smoothly, leading to uneven flavor in every bite.
👩🏼🍳 How To Make Cheesy Garlic Bread

- Step 1: Roast the garlic with oil in foil in a 400°F oven for 40 minutes. Squeeze the roasted garlic from the cloves into a bowl with the softened butter.

- Step 2: Add the Parmesan cheese, herbs, and salt, and stir until just combined.

- Step 3: Use a large serrated knife to slice the loaf in half, lengthwise.

- Step 4: Spread the garlic/butter mixture evenly over the cut side of the bread.

- Step 5: Top each loaf with shredded mozzarella.

- Step 6: Bake until cheese is melted and bubbly. Slice and serve at once!
Exepert Tip
To soften butter quickly without accidentally melting it, fill a tall glass or ceramic bowl with boiling water and let it sit for a minute to heat up. Pour the water out, quickly wipe the glass dry, and invert it over the cold stick of butter; the trapped residual heat will soften the butter to the perfect spreading consistency in just 5 to 10 minutes.
🍽️ How To Serve
- With a Crisp Caesar Salad: The salad’s fresh, tangy flavors provide a perfect contrast to the rich, buttery bread.
- Alongside Spaghetti and Meatballs: This bread is essential for mopping up every last drop of savory marinara sauce.
- With Chicken Parmesan: Pair it with this classic Italian-American dish for an ultimate comfort-food feast.
- Paired with Shrimp Marinara: The roasted garlic and herb notes in the bread beautifully enhance the flavors of the zesty seafood sauce.
🙋🏽♂️ Frequently Asked Questions
Yes, you can assemble the loaf with the garlic butter and cheese, wrap it tightly in plastic wrap, and refrigerate it for up to 24 hours before baking.
Any remaining slices should be kept in an airtight container or a zip-top bag in the refrigerator for up to three days.
Absolutely! Wrap the unbaked or baked loaf in foil and place it in a freezer-safe bag for up to three months; if baking from frozen, just add a few extra minutes to the oven time.
To maintain the crispy crust and melty topping, place slices in a 350°F oven or toaster oven for about 5–10 minutes until warmed through.
🇮🇹 Other Amazing Italian Starters or Sides


Ready to make the world’s best and most yummy Cheesy Garlic Bread? Go for it!
And when you make it, be sure to take a pic of it, post on Instagram, and tag @HowToFeedaLoon and #HowToFeedaLoon!

Cheesy Garlic Bread
Video
Ingredients
- 1 head garlic
- 1 tablespoon olive oil
- 6 tablespoon butter unsalted, room temp
- ¼ cup Parmesan cheese grated
- 2 tablespoon basil fresh, chopped
- 1 tablespoon chives fresh, chopped
- ¼ teaspoon Kosher salt
- 1 large loaf bread Italian or French work very well
- ½ cup mozzarella shredded
Instructions
Make the Roasted Garlic
- Preheat oven to 400°F.
- Use a sharp knife to carefully cut the top of the head of garlic off. It's okay if some of the cloves fall away from the head. No need to peel any of the garlic at this point.1 head garlic
- Place the garlic head and any loose cloves on a square piece of aluminum foil (about 6"x6"). Drizzle the oil over the top of the garlic and then bring the edges of the foil around the garlic and twist to close.1 tablespoon olive oil
- Roast the garlic in the oven for 40 minutes. Remove and let cool.
Prepare the Cheesy Garlic Bread
- Preheat oven (or increase, if still heated) to 450°F.
- Place the soft butter, parmesan cheese, basil, chives, and salt into a medium-sized bowl. Using your fingers, squeeze out the creamy roasted garlic from the garlic paper-like shells.6 tablespoon butter, ¼ cup Parmesan cheese, 2 tablespoon basil, 1 tablespoon chives, ¼ teaspoon Kosher salt
- Using a fork, mix until the mixture is blended.
- Using a serrated knife, cut the bread in half, lengthwise, into two halves. If desired, trim away the top portion of the bread slice that was the top of the original loaf. This will allow the slice to sit evenly, and also bake more evenly with the other slice (see video for reference).1 large loaf bread
- Add about 4 to 5 equal dollops of the butter mixture on each bread slice. Use a knife to carefully spread the mixture over the cut side of each slice.
- Sprinkle the mozzarella cheese over the two prepared slices.½ cup mozzarella
- Place the bread slices on large baking sheet and bake untl cheese has melted and the edges of the bread are golden brown. Slice and serve hot.
Notes
Nutrition
POST UPDATE NOTE: This recipe was originally posted in December 2014, but was updated with recipe improvements, new photography, and video in August, 2019.

Claire says
Epicurian Roasted Garlic Butter!!! Absolutely fabulous at a fraction of the price.
Kris Longwell says
Yum!! Love it!
Lin says
I love watching you two and love your recipes. I have a request please. Could you possibly put closed caption on your videos? I have hearing aids and it is hard to understand all your words. I know all your deaf and hearing impaired fans would love to know all the words y’all are saying. Thank you.
Kris Longwell says
Hi Lin!! Thank you so very much! We truly appreciate your feedback. Means the world to us. We are working with our video provider for the blog to have the ability to include closed captioning. Unfortunately, we can’t do that right now, however, we do include all of our videos over on our YouTube Channel. We do include ‘cc’ on those videos. We hope to have them on the blog, before too long, but in the meantime, check out our YouTube channel! Thanks again, Lin!