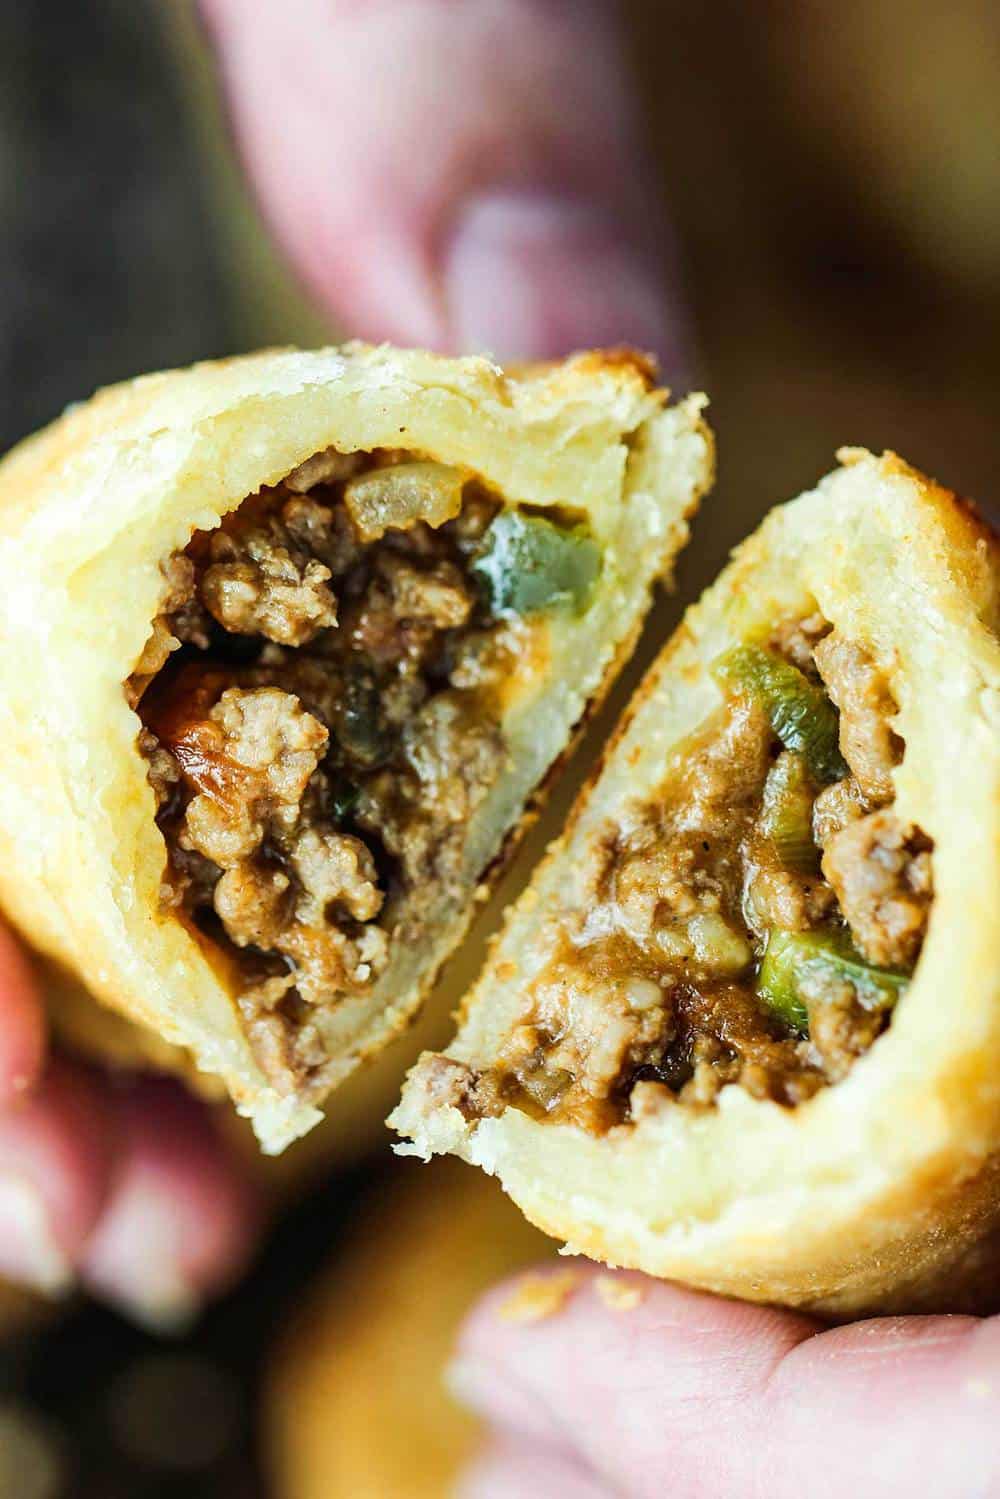
Classic Meat Pie is hands down one of our most favorite treats to eat. Ever.
Flaky crust. Savory filling. Perfection with each bite.
Oh, how we love a classic meat pie.

THE CLASSIC MEAT PIE RECIPE IS EASY TO MAKE AT HOME
Making the dough from scratch is essential, not difficult to do, and can be done well in advance!
Watch us show you how easy (and fun) it is to make these babies at home!
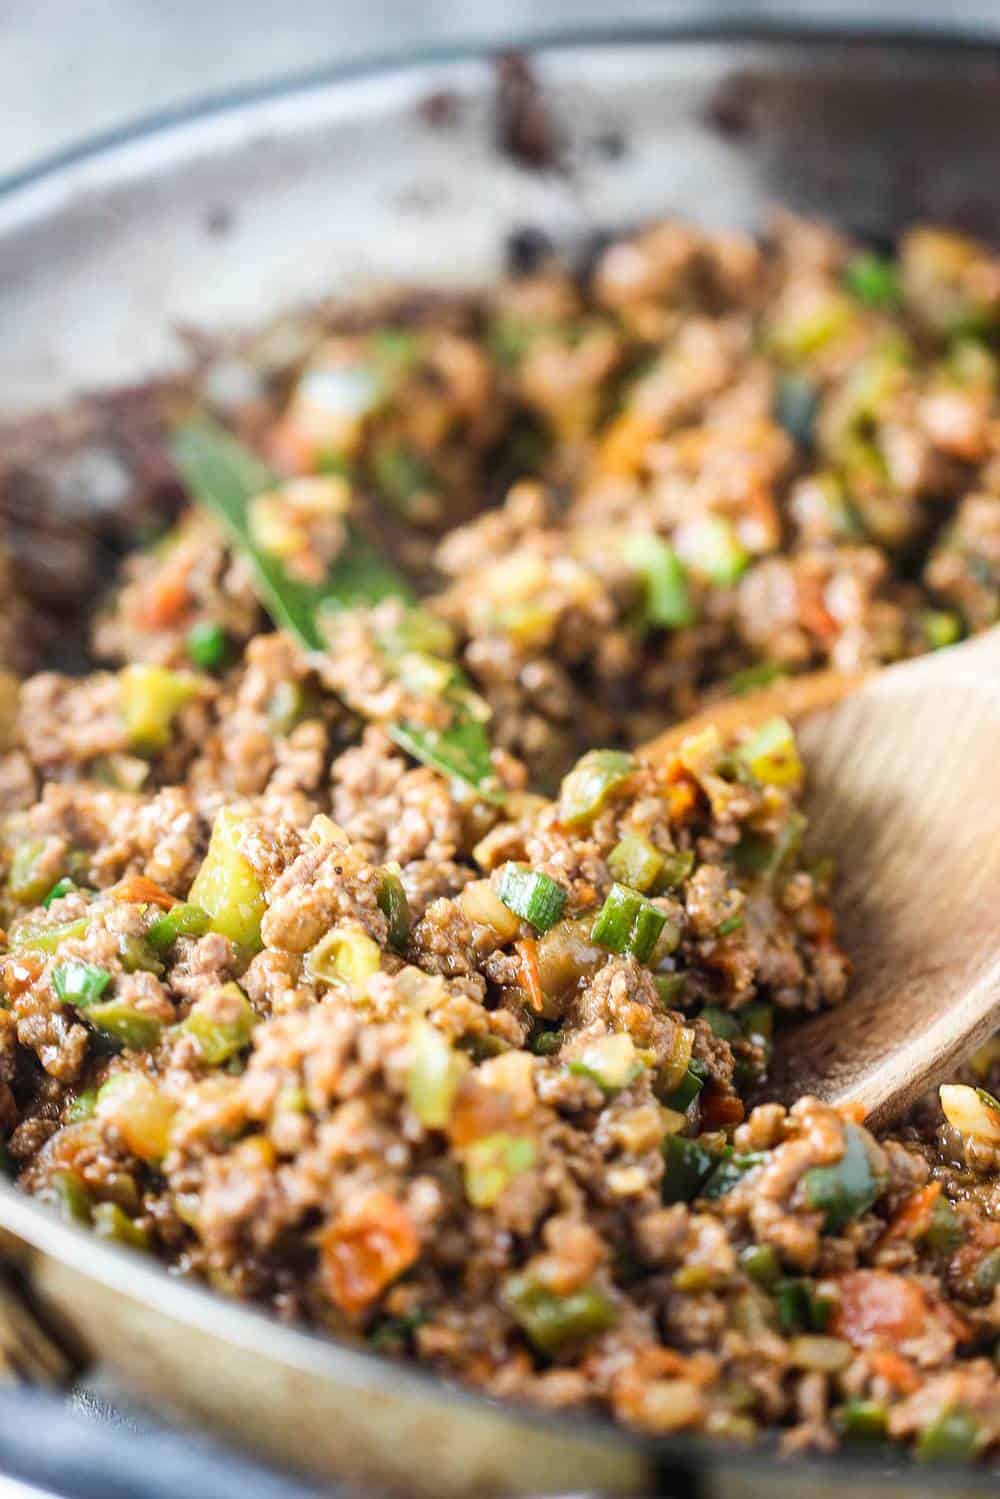
It all starts with a wonderfully flavorful, savory beef filling.
We love sautéing onions, bell peppers, and a little jalapeño to deepen the flavors.
You can adjust the seasonings to your own liking, but we love the little bit of kick in this recipe.
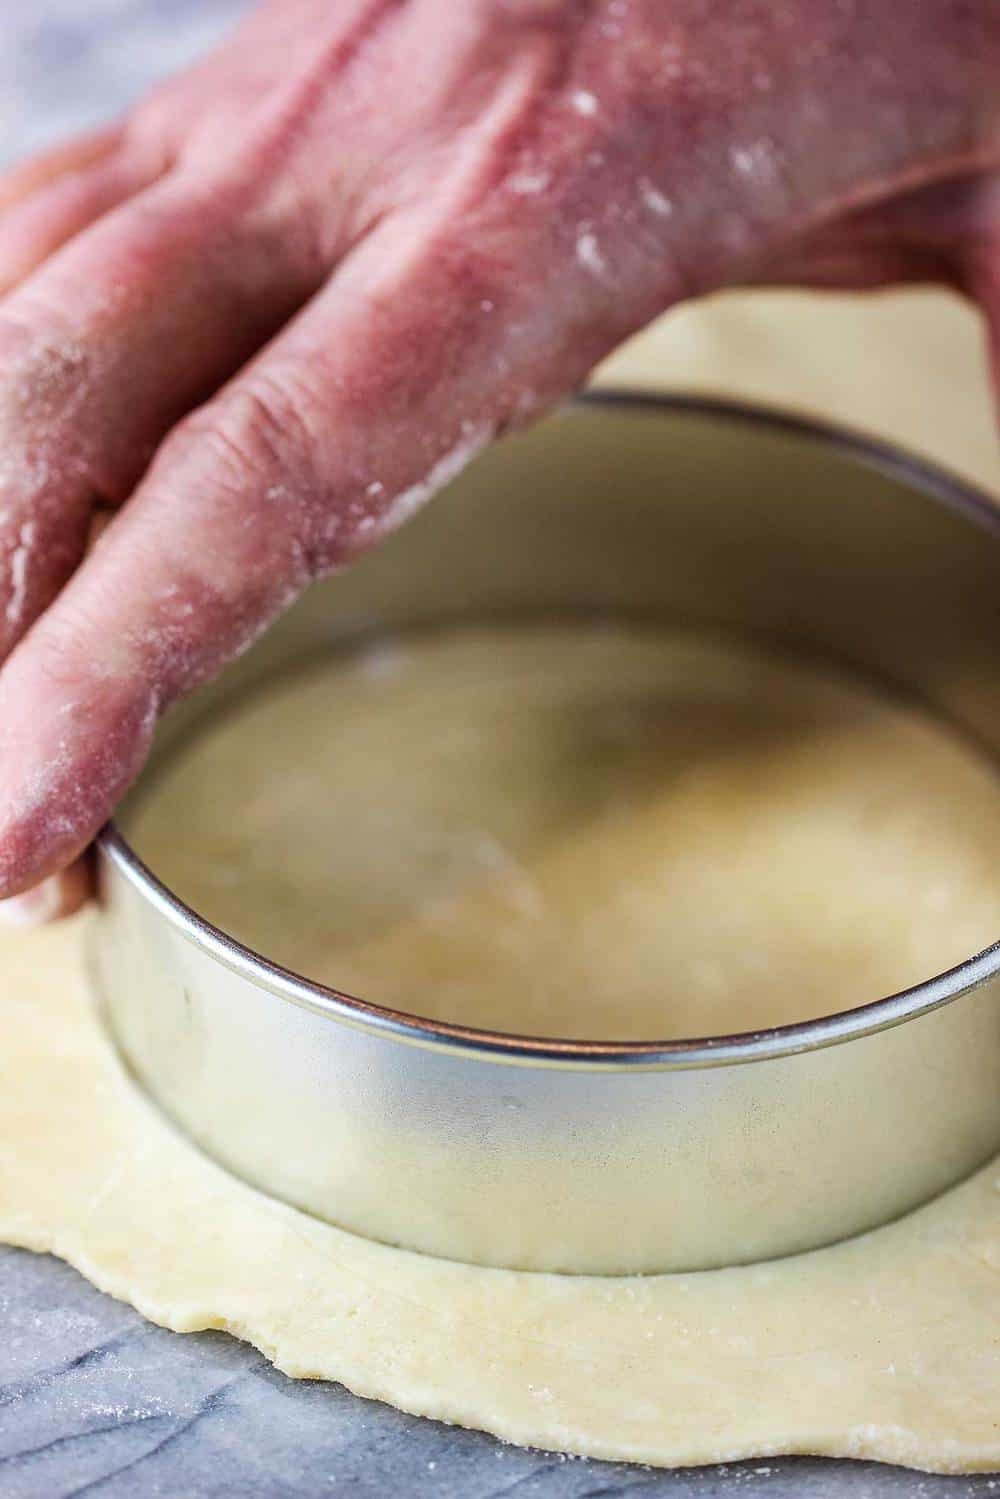
HOMEMADE PIE DOUGH MAKES THE PERFECT CRUST
Making the dough from scratch is simple and puts these meat pies over the top.
We use a 4-inch cutting ring (that we got at Williams-Sonoma) to cut the disc.
If you don’t have this size cutting ring, use a large jar lid, or even a pizza cutter and a steady hand. Point is…it doesn’t have to be perfect.
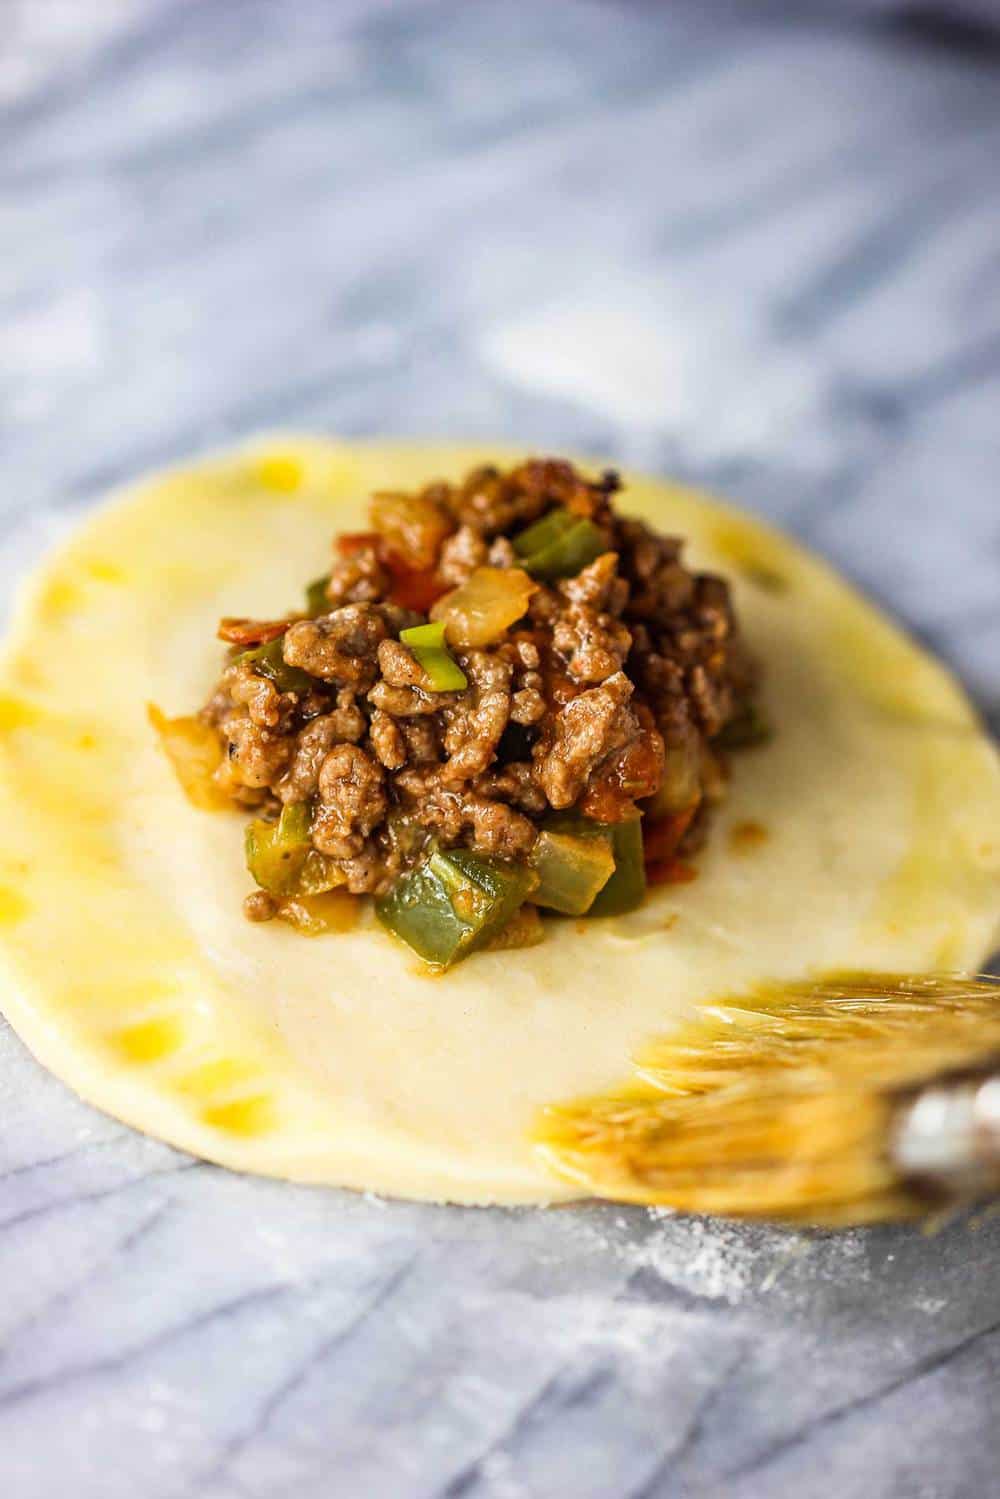
After cutting the dough, add a teaspoon or so of filling right in the middle of the disc.
You’ll want to brush the edges of the disc with an egg wash.
This will keep the classic meat pie sealed as it fries (or bakes).
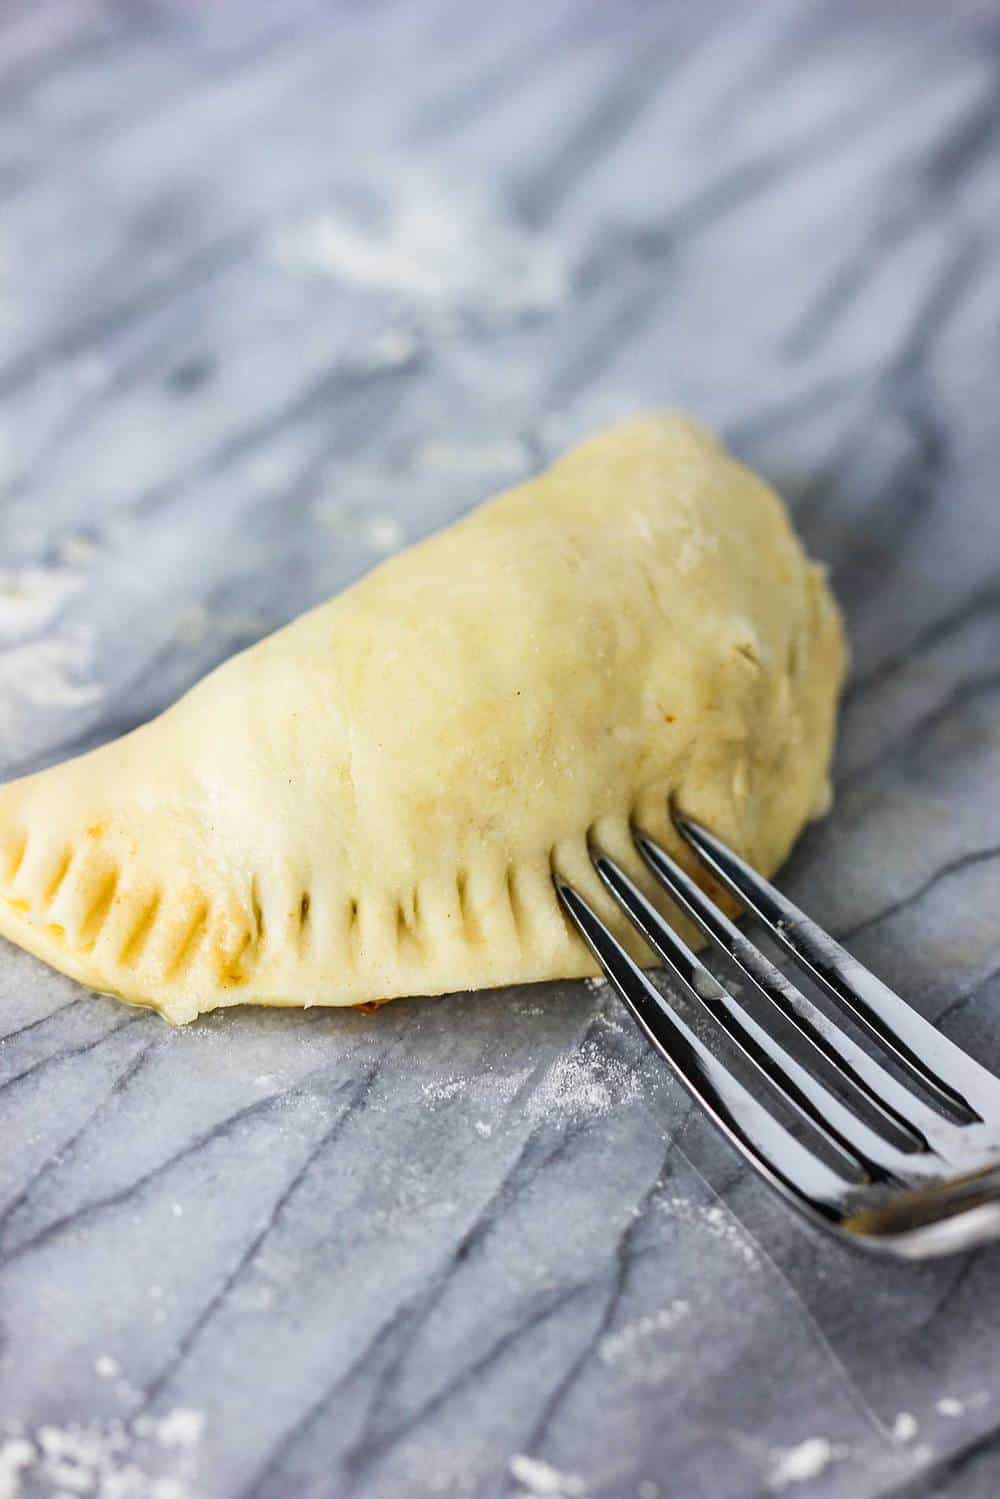
USE A FORK TO CRIMP AND SEAL THE EDGES
A fork is the perfect tool for sealing the dough edges.
Don’t worry if a little meat pie filling gets pinched as you’re sealing. It will still cook just fine.
We’re getting close to one of the most scrumptious snacks in the world!
We have to admit that we think frying these meat pies creates the perfect classic meat pie.
However, you can also bake these in the oven, and they will turn out beautifully.
If you fry them, be sure to use a large metal slotted spoon (or spider) to remove the meat pies from the oil.

CLASSIC MEAT PIE IS ALWAYS A CROWD FAVORITE
This recipe for Classic Meat Pie can easily be prepared ahead of time.
You can fill the meat pies and seal them, and then refrigerate them for 24 hours, or freeze up to 1 week.
You can also fry (or bake) them up several hours prior to serving, and then reheat them in the oven just before serving.

THERE IS NOTHING MUCH BETTER THAN A CLASSIC MEAT PIE
Wesley and I have always loved a good meat pie. So often we headed for a train in NYC, on a late night, and thought: “Well, we’d better grab something to eat, and it simply must be a yummy meat pie!”
Other amazing recipes where good ole beef is the star ingredient include:
- Gourmet Beef Stroganoff
- Pub-Style Guinness and Beef Pie
- Instant Pot Beef Short Ribs
- Hearty Beef Stew
- Asian Braised Short Ribs
In the meantime…go ahead and make these amazing Meat Pies!

Classic Meat Pie
Video
Ingredients
- 2 tablespoon vegetable oil
- 1 teaspoon Kosher salt
- ½ teaspoon cayenne pepper
- 1 teaspoon smoke paprika
- 1 teaspoon chili powder
- 1 teaspoon cumin ground
- ¼ teaspoon ground white pepper
- ½ teaspoon ground black pepper
- 1 lb ground beef
- 1 small yellow onion chopped
- 1 green pepper cored, seeded, and chopped
- 1 jalapeno stemmed, seeded, and chopped
- 4 plum tomatoes diced
- 1 teaspoon dried thyme
- 4 fresh bay leaves
- ½ teaspoon Worcestershire sauce
- 2 tablespoon all-purpose flour
- 2 tablespoon water
- 1 bunch of scallions thinly sliced, about ½ cup
- 5 dashes of Louisiana hot sauce
- Pie Dough
- 1 eggs
- Vegetable oil for frying
Instructions
- Heat the oil in your deep fryer or a 12-inch skillet over medium-high heat.2 tablespoon vegetable oil
- In a medium bowl, mix the salt, cayenne, paprika, chili powder, cumin, white pepper, and black pepper.1 teaspoon Kosher salt, ½ teaspoon cayenne pepper, 1 teaspoon smoke paprika, 1 teaspoon chili powder, 1 teaspoon cumin, ¼ teaspoon ground white pepper, ½ teaspoon ground black pepper
- Sprinkle over the beef.1 lb ground beef
- Cook in a large skillet or medium high heat heat for about 8 minutes.
- Add the onion, bell pepper, jalapeno, tomatoes, dried thyme, bay leaves, and Worcestershire sauce, and cook, stirring for an extra 15 minutes, until most of the juices have evaporated and the veggies have softened.1 small yellow onion, 1 green pepper, 1 jalapeno, 4 plum tomatoes, 1 teaspoon dried thyme, 4 fresh bay leaves, ½ teaspoon Worcestershire sauce
- Dust the flour over the meat and add the water, stirring to combine (this will tighten up the mixture).2 tablespoon all-purpose flour, 2 tablespoon water
- Stir in the scallion and hot sauce, and transfer the mixture to a baking pan.1 bunch of scallions, 5 dashes of Louisiana hot sauce
- Line two baking pans with parchment paper and a dusting of flour.
- Divide the dough into four even sections.
- Return the 3 sections to the fridge.
- Dust your counter with flour and roll out the first section until it's just under a ¼-inch thick.
- Use a 4-inch biscuit cutter (or a lid of a jar) to cut the dough into rounds.
- Lightly brush the outer edges of each round with the egg wash.1 eggs
- Place 1 to 2 teaspoons of the filling in the center of each round.
- Fold the circle over the filling to make a half circle.
- Using the back side of a fork, press around the edges to seal the pie.
- Transfer the pies to the prepared baking sheet
- Refrigerate for at least 30 minutes.
- To fry the pies, heat your deep fryer, or 2½ inches of oil in a large case iron skillet to 350°F. (Or, heat your oven to 350°F.)Vegetable oil
- Fry the chilled pies in batches. (Or, bake in oven for 35 to 40 minutes, or until pies are golden brown, and disregard the next two steps.)
- Drain on paper towels.
- Keep warm in the oven as you fry up the other pies.


Kelly says
I made this a few weeks ago because my husband asked for a meat pie. I was hesitant because of a meat pie thing I was served in elementary school. Yes, some things scar you for your entire life. LOL
Well I have to say, this recipe cured me. It was so tasty and the pie crust made it. This is on my list of favs now!
Kris Longwell says
Woo hoo!! That’s awesome to hear, Kelly! We made a meat pie believer out of you afterall! Our mission is complete!! LOL! So glad you and your hubby enjoyed the meat pie recipe and thank you SO MUCH for letting us know and the awesome review!! That means the world to us!! Stay in touch! Best, Kris & Wesley
Aiden K. says
Whoa! Thank ya’ll! This was my first recipe with you. I also used the Pie Crust recipe. I remixed: I added thyme and sage to the dough. I used pork chops cut into small cubes and cooked them in Worcester, EVOO, onion, garlic, garlic powder, oregano, urtesalt (a treasure from a trip to Denmark), peach hot sauce and black pepper. Then I put down jalapeño goat cheese and vegan basil pesto and layered on the pork, then folded those sweeties over! I LOOOVED them so thank you for making a comprehensive meat pie recipe! Very good.
Kris Longwell says
Hi Aiden!! Everything you described sounds absolutely heavenly!! We are so glad you had such great success with the meat pies and thank you SO SO SO MUCH for letting us know and for the great review. That means so much to us!!
Carla Zamiska says
This was one of my self isolation during a global pandemic projects, they all somehow involve lots of flour.
During the process of working with the pie dough and making the actual meat pies, I think I went through about 50 different emotions and invented about 3 new cuss words.
In said process, I learned a lot about working with this dough. My grubby fingers couldn’t stay off the dough, making it warm and difficult to work with. Slowly but surely, I made the most hideous meat pies anyone has ever seen. Tips for anyone new like me: once I started throwing the dough in the freezer to chill inbetween batches, it became much more easy. Also, use plenty of flour to dust the dough while working with it. And lastly, I started putting the egg wash on just half the round. By the time I was ready to fry them, I swore off meat pies for life.
I baked mine out of fear that they would fall apart in the oil. My Frankenstein meat pies came out of the oven smelling like absolute heaven and tasted even better. My son and fiancé went crazy over them.
Thanks for this pandemic project, it was wildly delicious. I rescind my meat pie angst and look forward to making more and becoming better at the process.
Oh, and I’ll probably watch the video where you clearly give instructions to a newbie like me, almost like that’s why that was put there. Hmm.
Kris Longwell says
Woo hoo, Carla!! We totally get it! Making any kind of pastry takes practice and patience! And sounds like you had both!! We are so so so glad they turned out awesome. Congratulations!!! That is fantastic. And thank you so much for letting us know and for the GREAT review!!! Stay in touch!! All the best, Kris & Wesley
Carla Zamiska says
Ps—made more today. I made them a little bigger like yours and they were PERFECT! Tagged you on insta. Thanks so much!!!
Kris Longwell says
AMAZING!!! We actually didn’t see them on IG!! Can you re-tag us @howtofeedaloon? So excited to see them!!!!
Briana says
Lovely recipe! Thank you
Kris Longwell says
Thank you, Briana!! We are so glad you enjoyed the meat pie recipe and thank you SO MUCH for the great review!!
Matt says
You list cumin in the recipe but not in the ingredients.
Kris Longwell says
1 tsp! Thanks for the heads up, recipe has been updated to reflect this!! Thanks again!!
perpetua okeke says
I will try these. I love meat pies/beef patties
Kris Longwell says
They’re so good! Let us know if you make them and what you think!
Daniel Silva says
I’ve made this recipe in the past month and it’s a 10/10, I didn’t use cayenne and substituted poblanos for the green bell and they’re just awesome. Currently baking my second batch.
Kris Longwell says
AWESOME!!
Anne Samuel says
Hi Kris and Wesley,
So it’s crunch time and I’ve had issues with my batch. I find it too wet and I need to call it quits for the day, the plan is to put it in the fridge and by tomorrow hoping it will have thickened?
Also , any tips on how to ensure the pastry dough is rolled out to 1/4 inch thickness?
Thank you again for this amazing recipe, I shall try again 🙂
Best,
Anne
Monica M Collor says
I love it
Kris Longwell says
Awesome!!!! Thank you so much!
Cheryl says
These look soooo good! Going to make them tomorrow night! You guys are great, the loon cracks me up. I have been binge watching all of your videos… thank you so much!!
Kris Longwell says
Thanks, Cheryl!!! We hope you enjoy them as much as we do, and don’t hesitate to reach out with any questions. And of course, let us know how they turn out and what you think. We love ’em so much!! Kris & Wesley
Cait says
Delicious! I baked mine and froze some to hopefully be fried at a later date! Seems like the perfect do ahead Party appetizer. Also thank you for the encouragement to make pie crust. It was delicious and easier than I thought it would be.
krislongwell says
Hi Cait!! That is so fantastic to hear! Baking them is a wonderful way to prepare these. And freezing will work perfectly for you. And congrats on making your own pie dough! That’s so awesome and really does take them to another level, right? And thanks very much for letting us know. That truly means the world to us. Please stay in touch! All the best, Kris & Wesley
Jeremy says
Thanks for this receipt. I’ll cook it with my family
krislongwell says
Awesome! Let us know what you think, Jeremy!! Best, Kris & Wesley
Janie Claypool says
How about a dipping sauce for these?
krislongwell says
Our Kickin’ Remouladee would be awesome!
Darlene says
Do you store any left over pies in the refrigerator or in the freezer?
These look absolutely delicious and I can’t wait to make them. Thank you.
Darlene says
Do you store any leftover pies in the refrigerator or do you freeze them?
These look absolutely delicious and I can’t wait to make them.
krislongwell says
Hi Darlene!! So sorry for the delayed response. Once the pies are fried (or baked), they’ll stay best in the fridge for 3 to 4 days. I’ve honestly never frozen them once they’ve been cooked, but they should be okay for up to a month. I’d suggest letting them thaw and then re-heat in the oven to crisp them back up. Of course, they won’t be a good when they are fresh, but they’ll still be delicious. The pies do freeze perfectly before you fry them, too. Make a batch, but don’t fry or bake them, then freeze them, then let them thaw and then cook. They’ll be super delicious. Hope this helps and let us know if you make them and what you think!! All the best, Kris & Wesley
Cori says
If you look at the ingredients at the bottom it says Pie Dough click on it and it will take you to the recipe. I was also thinking while I was watching the video that it might taste good if you add cheese to the pies before you close them up.
krislongwell says
Yes!! Cheese is always a wonderful addition!!! That would be great!!
Jan Schmidt says
Where are ingredients for pie dough?
Jackie Haywood says
Dough recipe?
krislongwell says
Hi Jackie! Sorry for the delayed response. If you click on the link for Pie Dough, you’ll see the recipe. Hope this helps!! Best, Kris & Wesley
krislongwell says
Hi Jan
The pie dough in the ingredients is a link that brings you to our all-purpose pie dough. You’ll see the ingredients there. We’ll add “click for recipe”’next to ‘Pie Dough’ to make it clearer.
Thanks and let us know if anything else is unclear!
Best, Kris & Wesley