
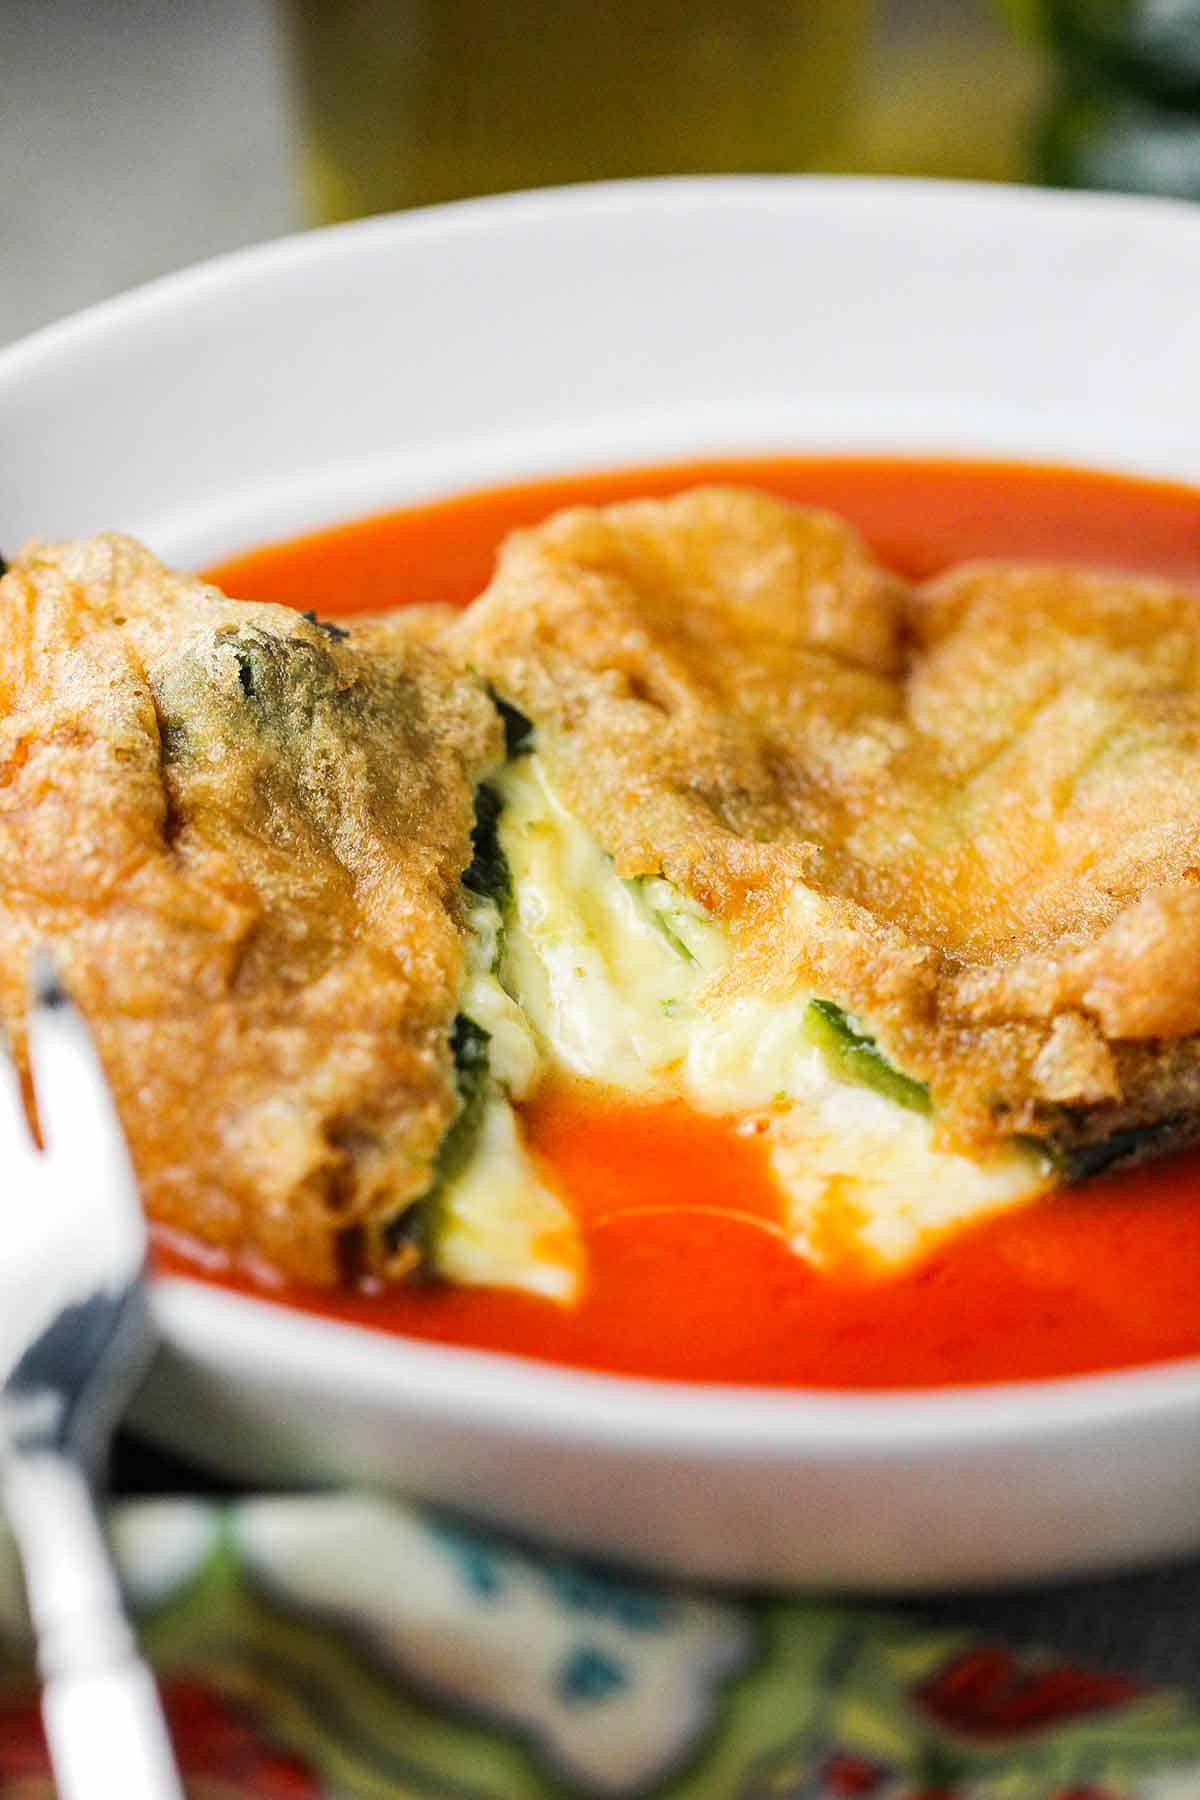
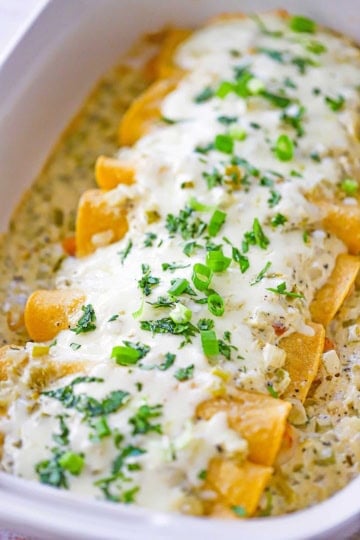
Experience the true taste of Mexico with these authentic Chile Rellenos, featuring roasted poblano peppers stuffed with melty cheese and fried in a light, fluffy egg batter. Serve them alongside homemade Mexican rice and authentic refried beans for the ultimate restaurant-style dish right in your own kitchen.
Jump to:
🧀 The Ingredients
This recipe pairs fresh, roasted peppers and melty cheese with a vibrant, herb-infused red sauce made from traditional pantry staples for a perfectly balanced meal. Find ingredient notes (including substitutions and variations) below.
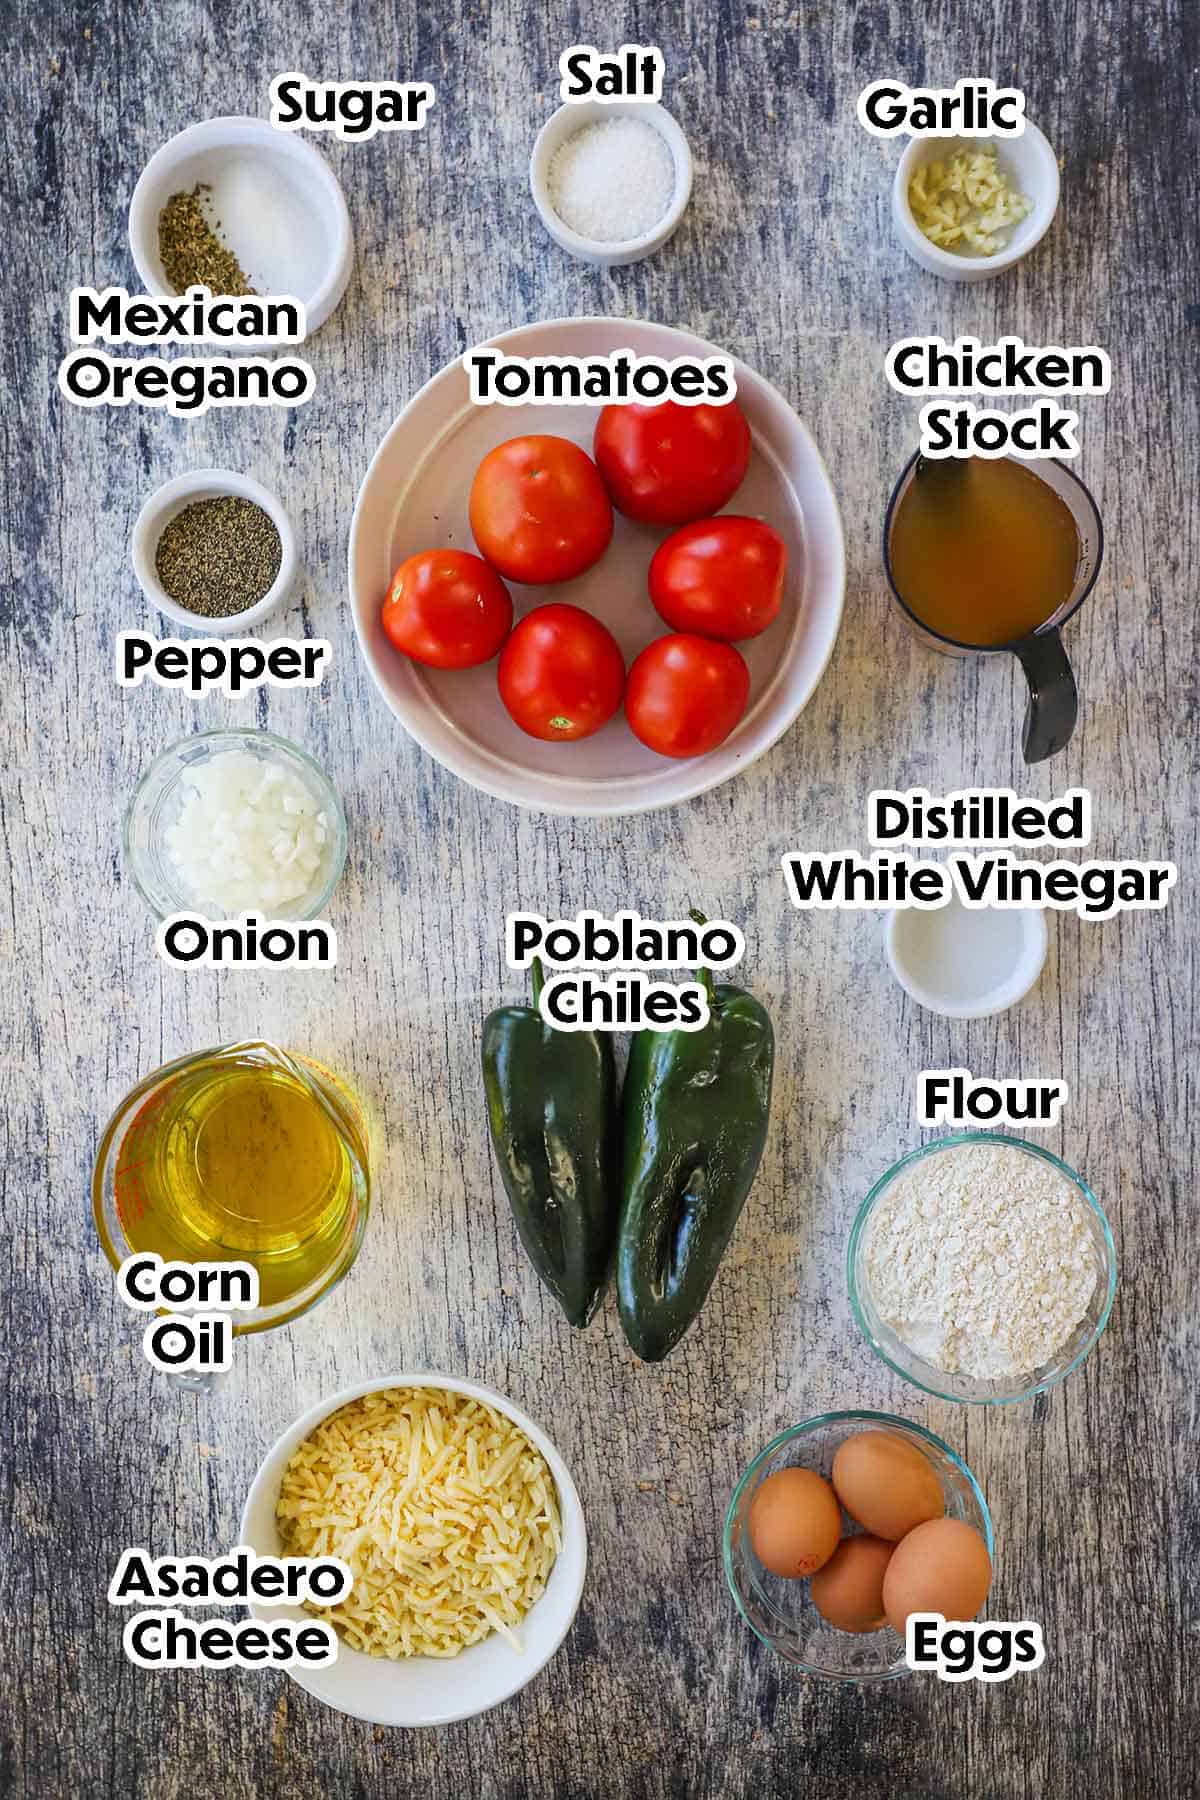
📝 Ingredient Notes and Substitutions
- Poblano Peppers: Choose large, firm peppers with smooth skin, as they are easier to roast, peel, and stuff. If poblanos aren’t available, Anaheim peppers are a great alternative, though they are narrower and have thinner walls.
- Asadero Cheese: This is a classic Mexican melting cheese with a mild, creamy flavor. If you can’t find it, you can substitute it with Oaxaca, Chihuahua, Monterey Jack, or even a low-moisture mozzarella.
- Mexican Oregano: This variety is related to lemon verbena and has citrusy, earthy notes. If you only have Mediterranean oregano on hand, use a slightly smaller amount, or substitute with marjoram for a closer flavor profile.
- Corn Oil: Preferred for its high smoke point and neutral flavor, which allows the taste of the chiles to shine. You can also use vegetable, canola, or grapeseed oil for frying.
- Chicken Stock: For the red sauce, chicken stock adds a nice depth of flavor. However, if you want to keep the dish vegetarian, you can easily swap it for a high-quality vegetable broth.
Refer to the recipe card (with video) below for a full list of ingredients and measurements.
🔥 Tips and Tricks for Perfect Chile Rellenos
- The “Oil Seal” Technique: Once you place the battered pepper into the hot oil, immediately use a spoon to carefully splash a little hot oil over the top of the pepper. This helps the egg batter set and seal over the slit instantly, preventing the cheese from leaking out into the pan.
- Dry the Chiles Thoroughly: After roasting and peeling the poblanos, make sure to pat them completely dry with paper towels. If there is any moisture left on the surface, the flour won’t stick, which will cause the egg batter to slide off during frying.
- Don’t Over-Beat the Batter: Beat your egg whites until they form stiff peaks, then gently fold in the yolks. Use the batter immediately; if it sits for too long, it will lose its airiness and become runny, making it difficult to coat the peppers.
- Use Toothpicks if Needed: If your peppers are particularly soft or have a large opening, you can use a toothpick to pin the slit shut after stuffing. This provides extra security—just be sure to remove the toothpicks before serving!
- Maintain Oil Temperature: Keep your oil around 350°F (175°C). If the oil is too cold, the batter will soak up the grease and become heavy; if it’s too hot, the outside will burn before the cheese inside has a chance to melt.
👩🏼🍳 How to Make Authentic Chile Relleno
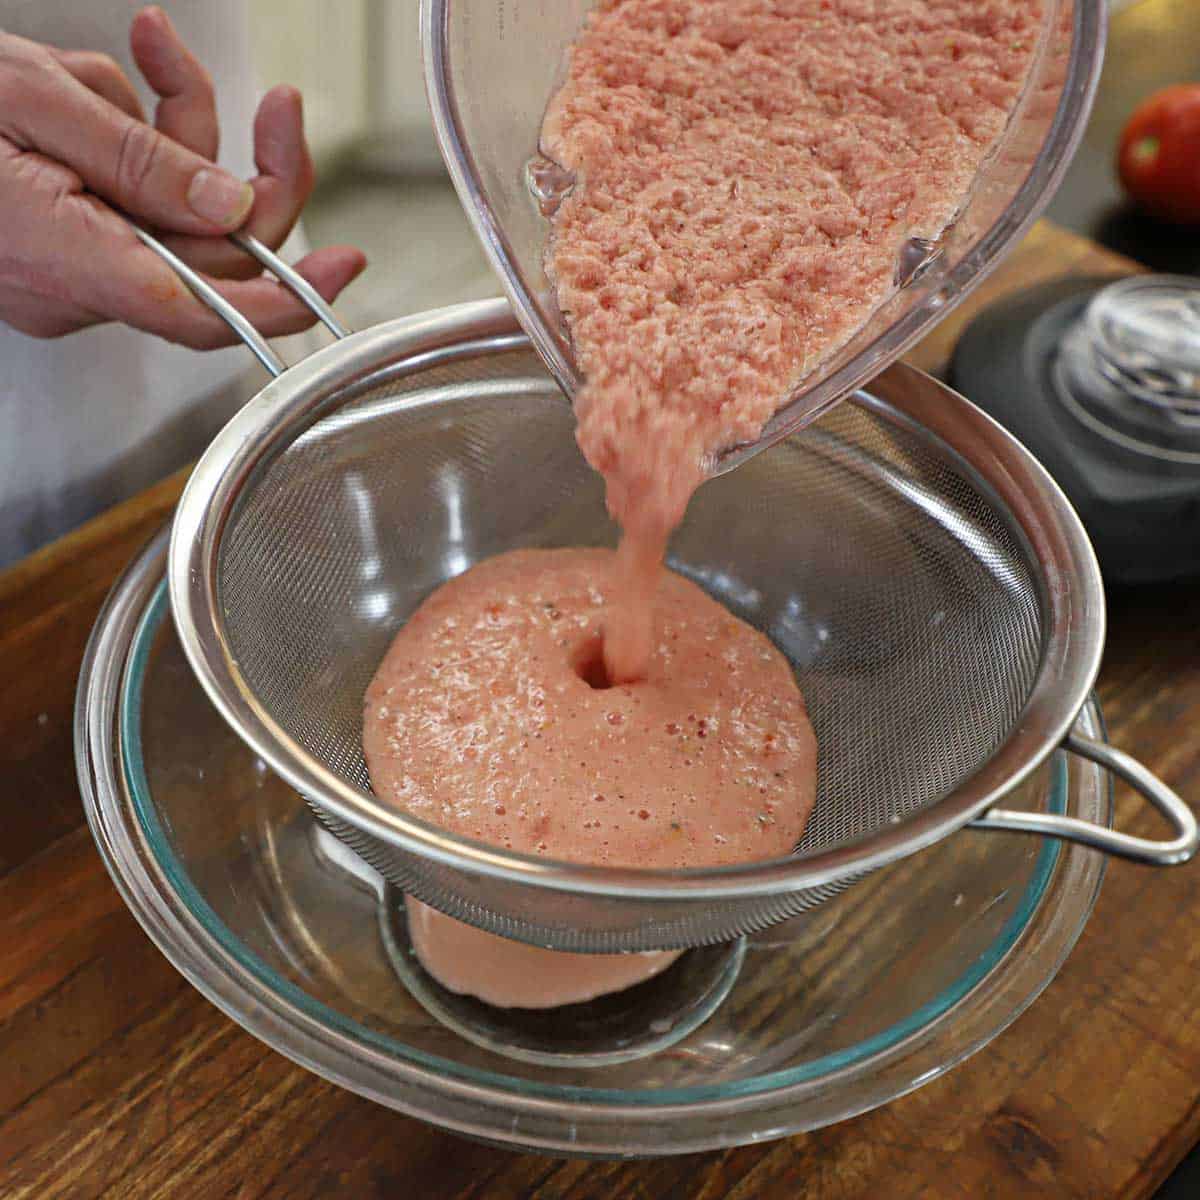
- Step 1: Purée all of the sauce ingredients (except the oil) and then strain into a bowl.
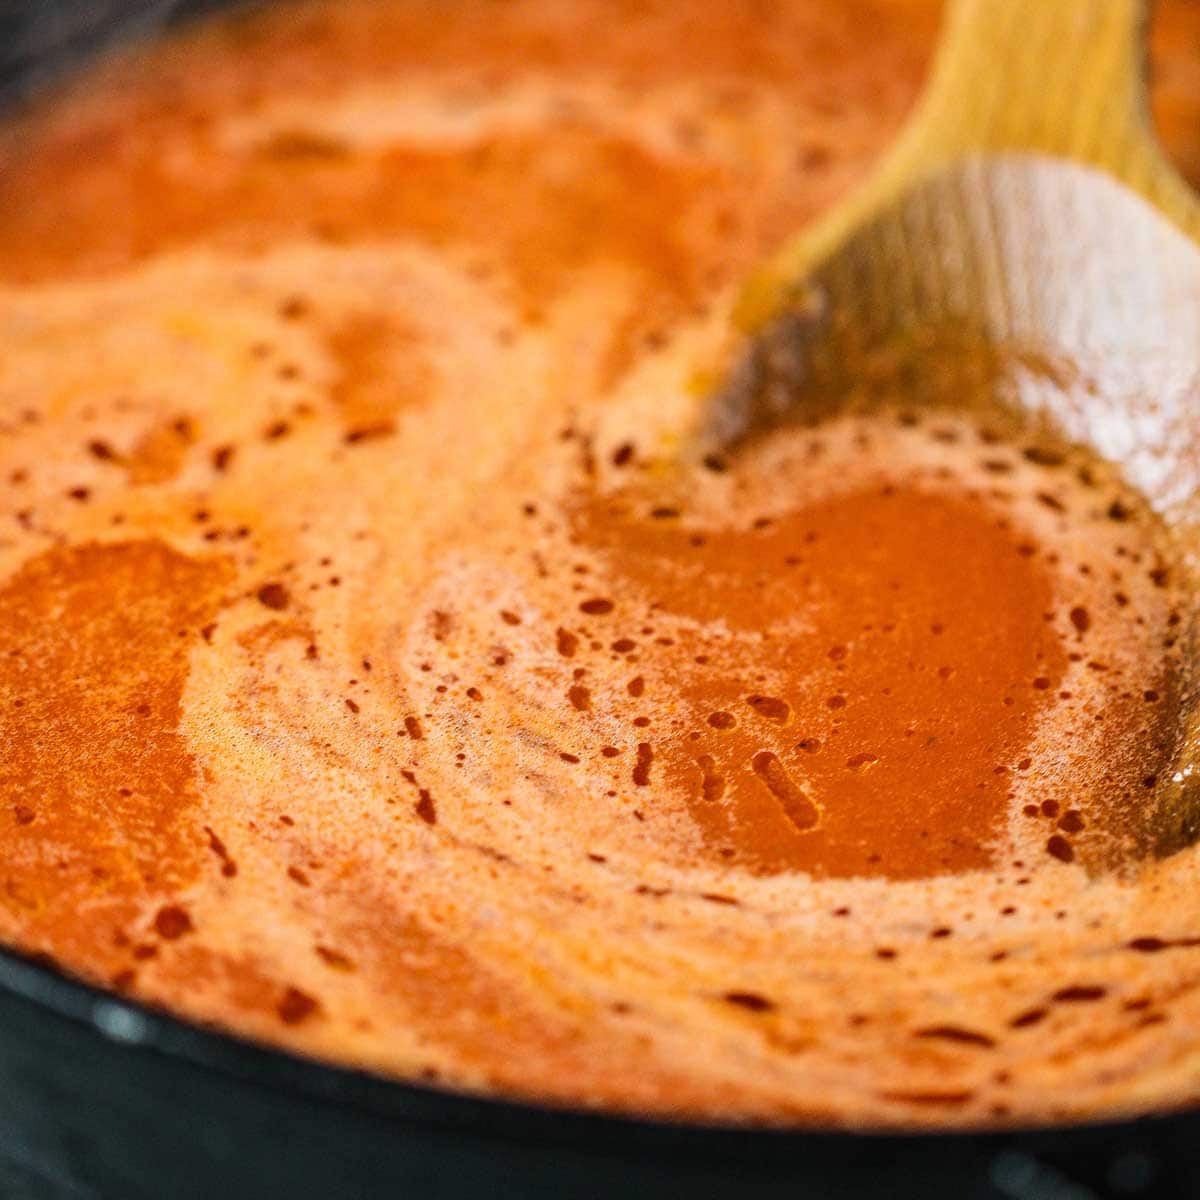
- Step 2: Heat the oil in a skillet and add the puréed mixture. Simmer, stirring often, for 10 minutes. Adjust seasonings, if necessary. Set aside.
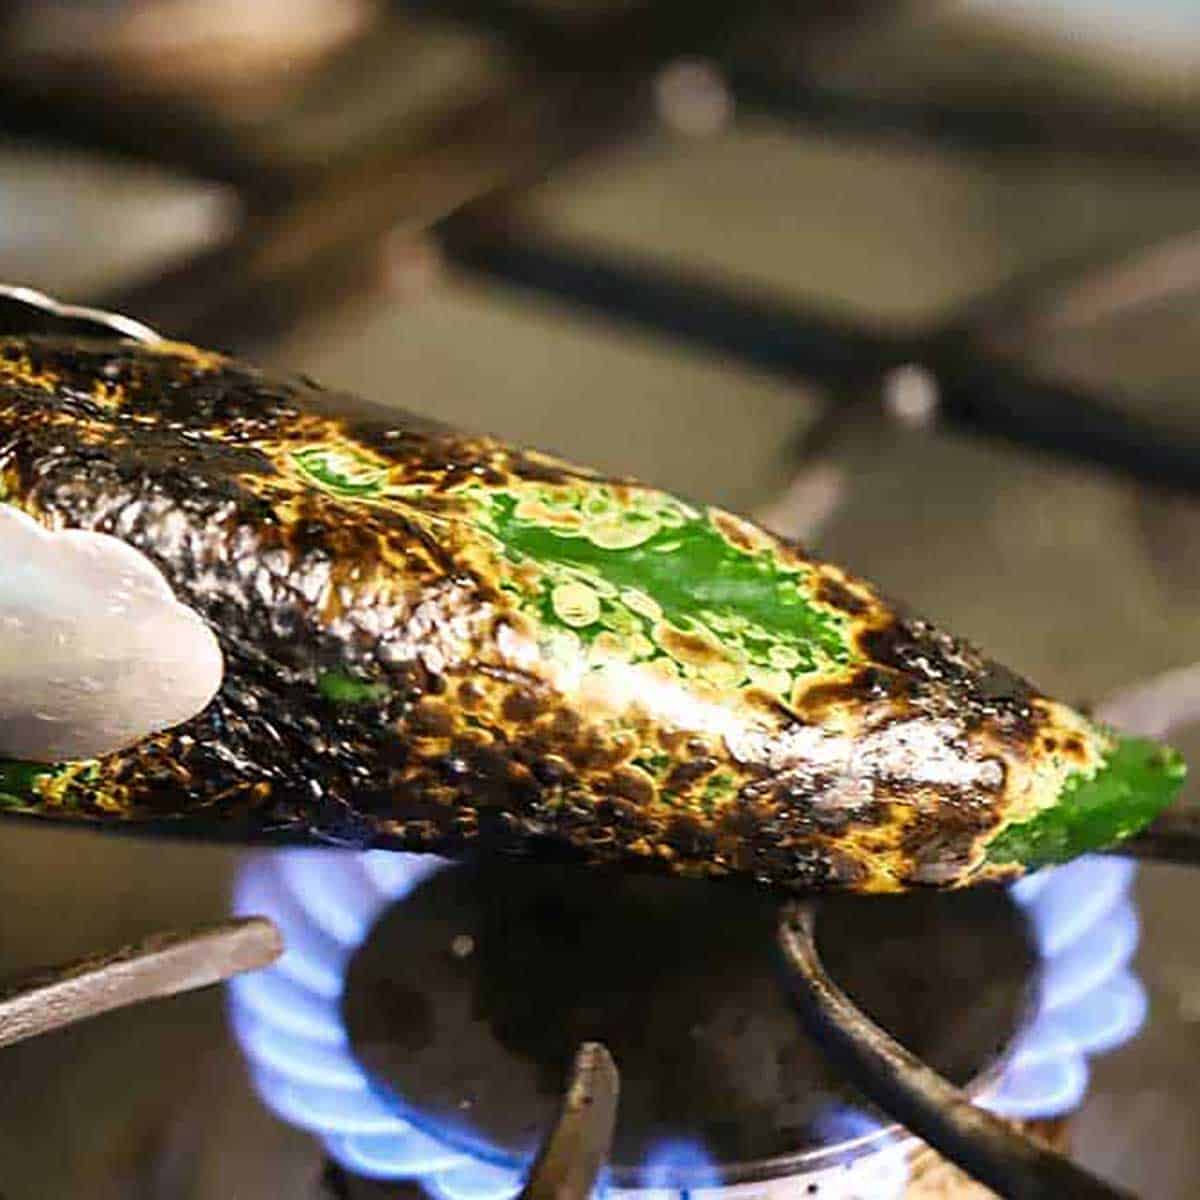
- Step 3: Roast the chiles over a gas flame or under the broiler until charred all over.
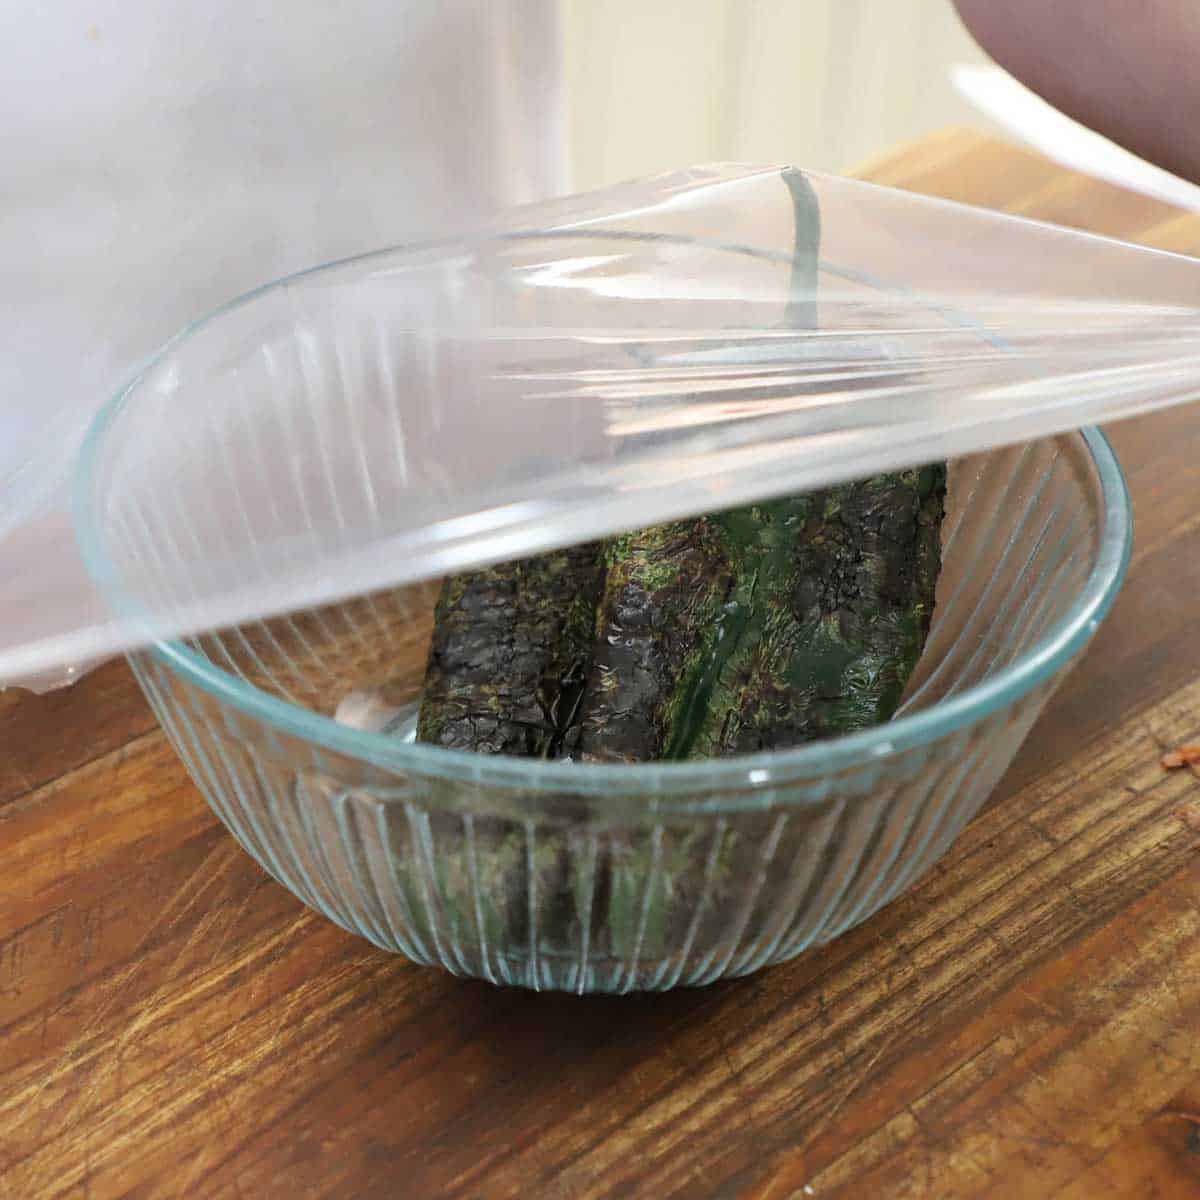
- Step 4: Place the chiles in a bowl and cover with plastic wrap for 20 minutes.
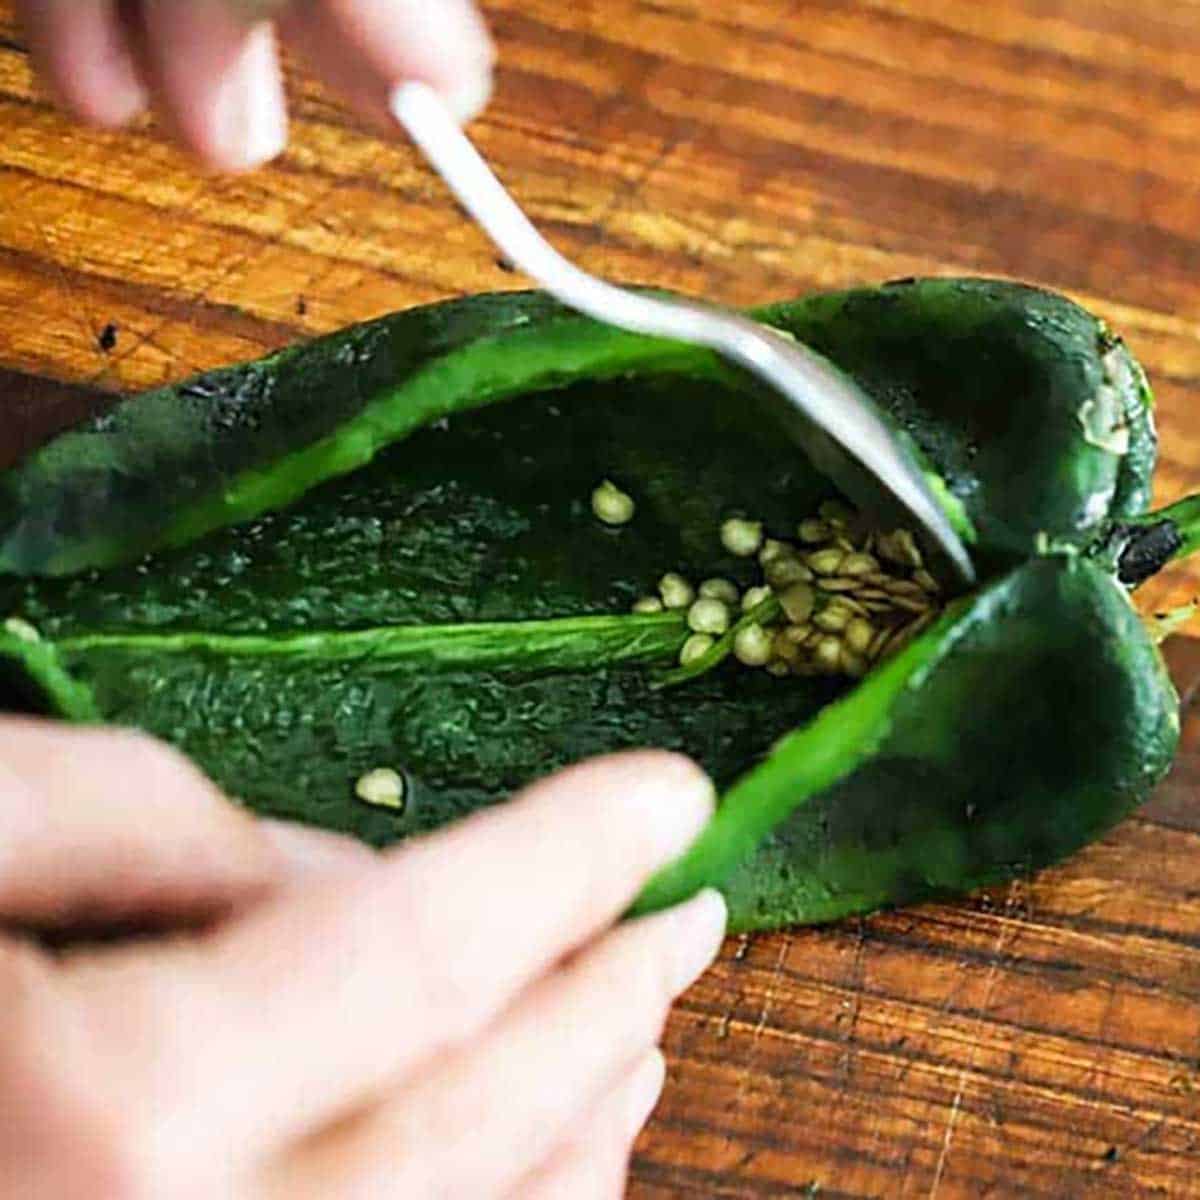
- Step 5: Make a slit down the side of each chile. Use a spoon to scrape out the pot and the seeds.
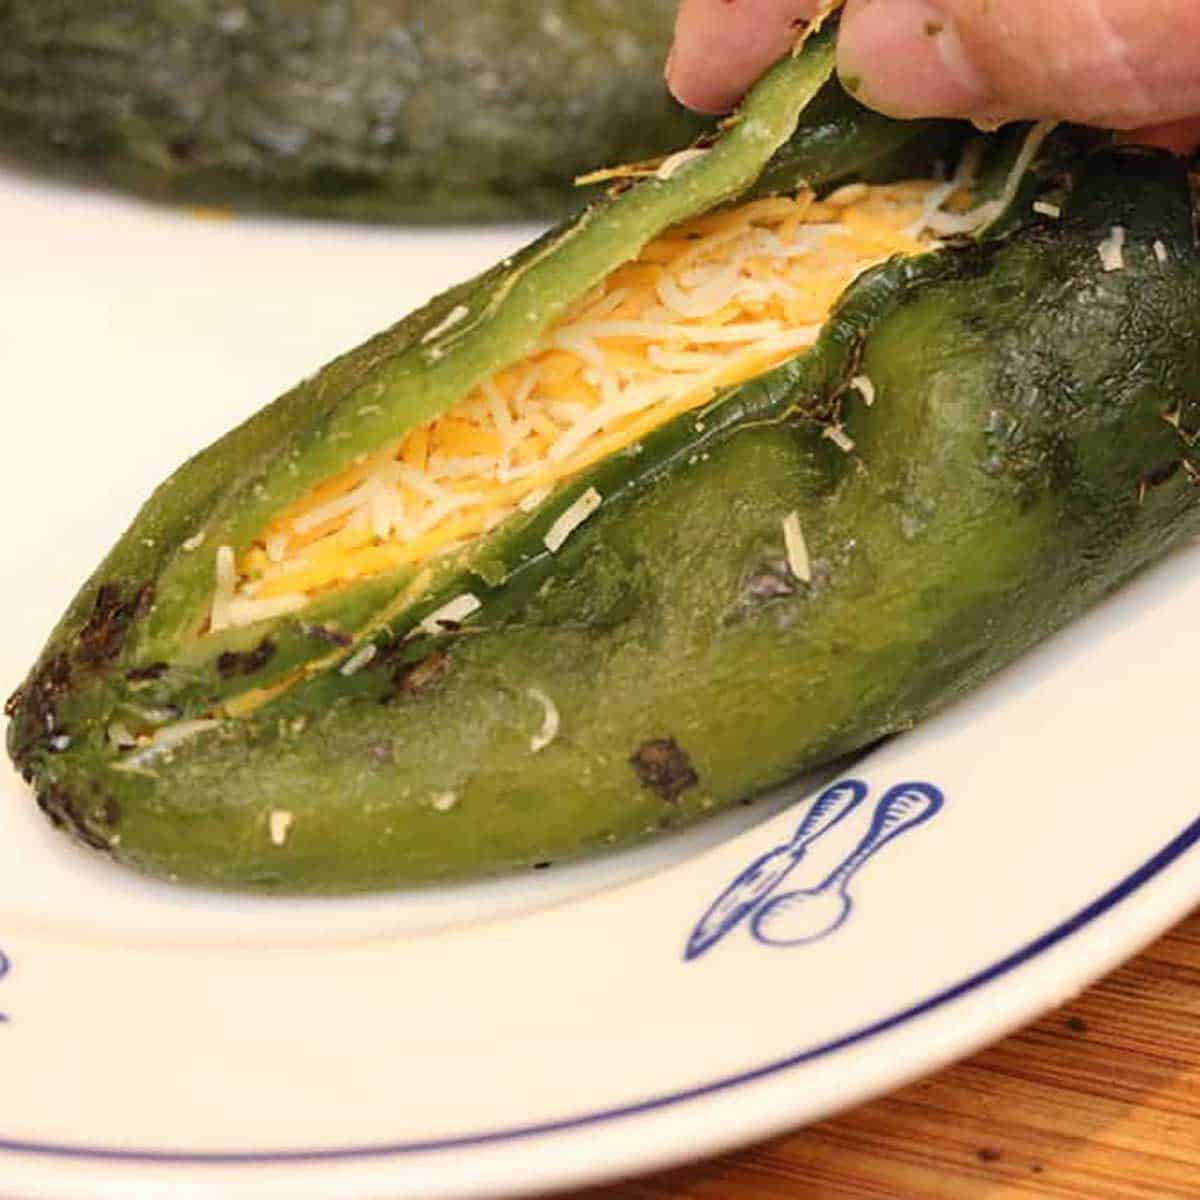
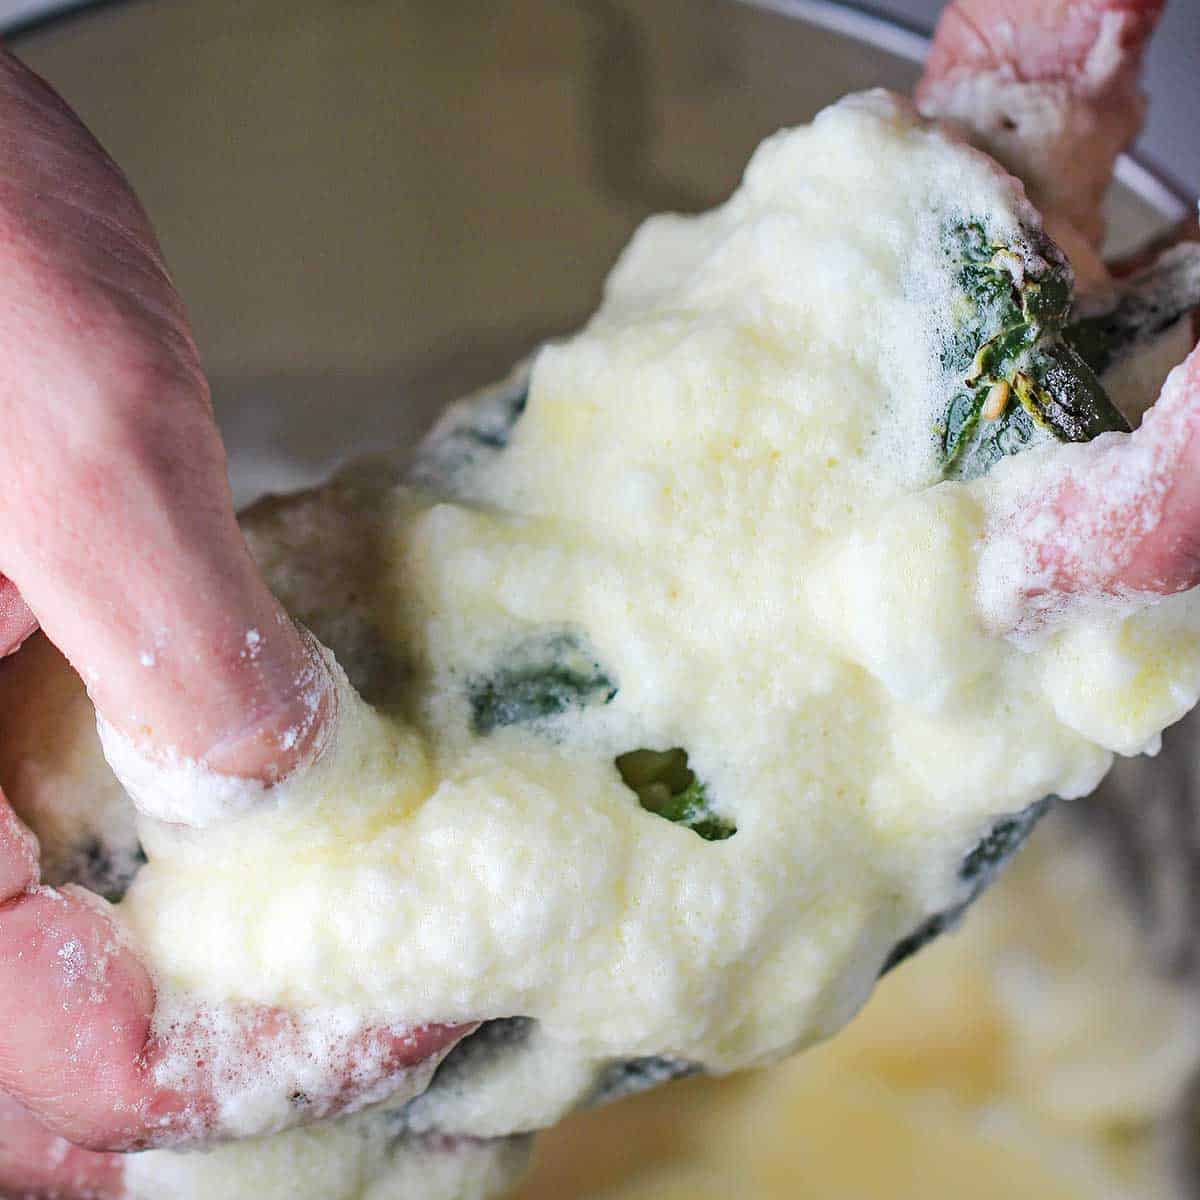
- Step 6: Stuff the chiles with cheese (or your favorite protein).
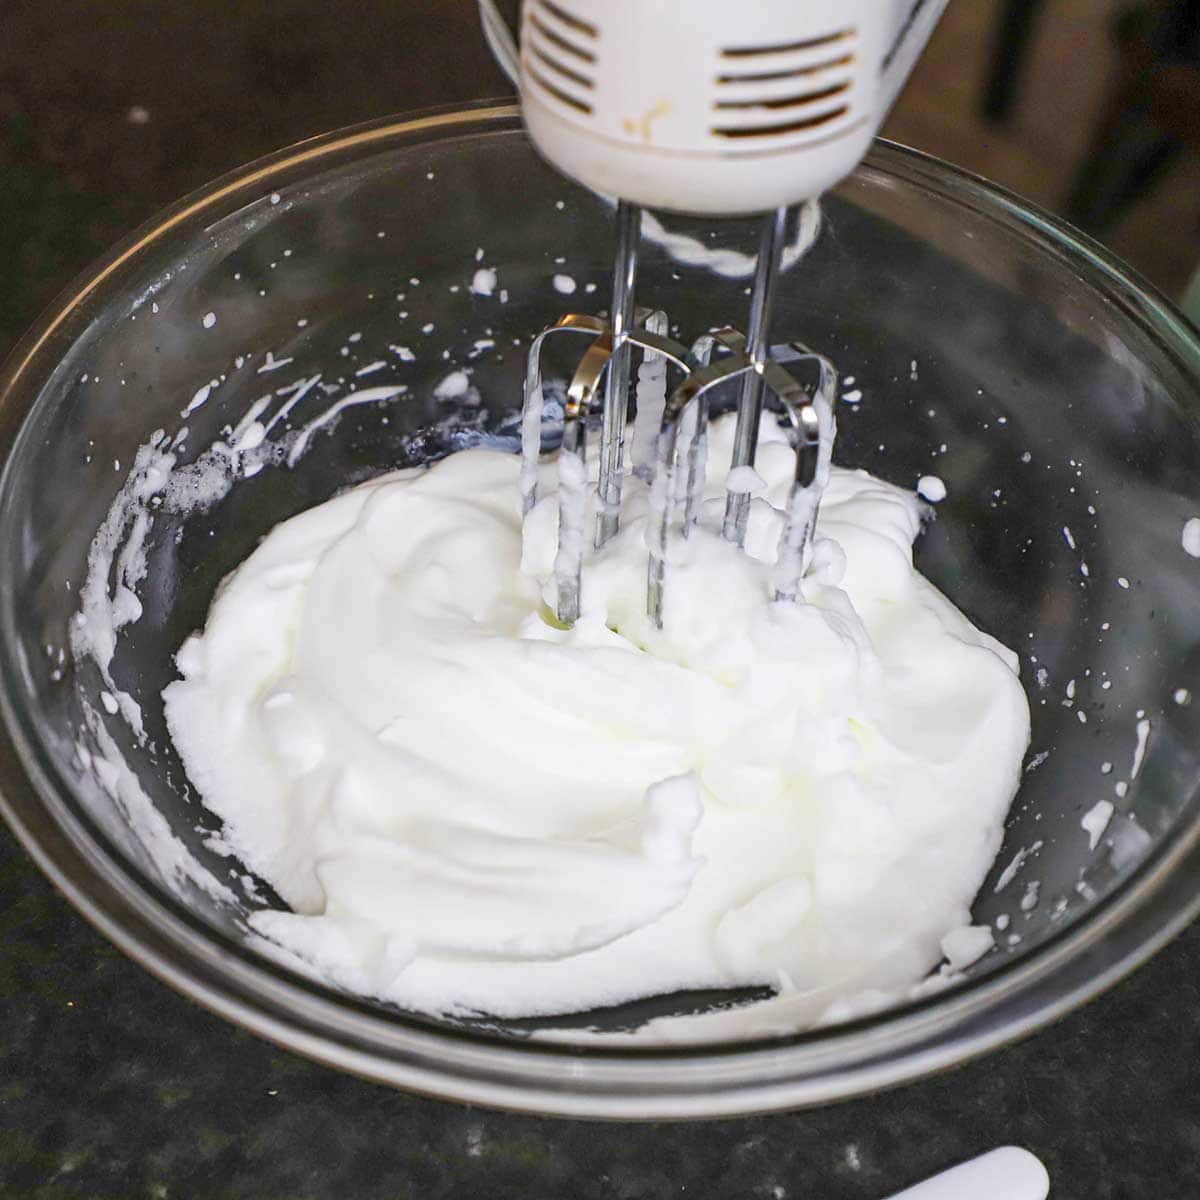
- Step 7: Beat the egg whites until stiff peaks form.
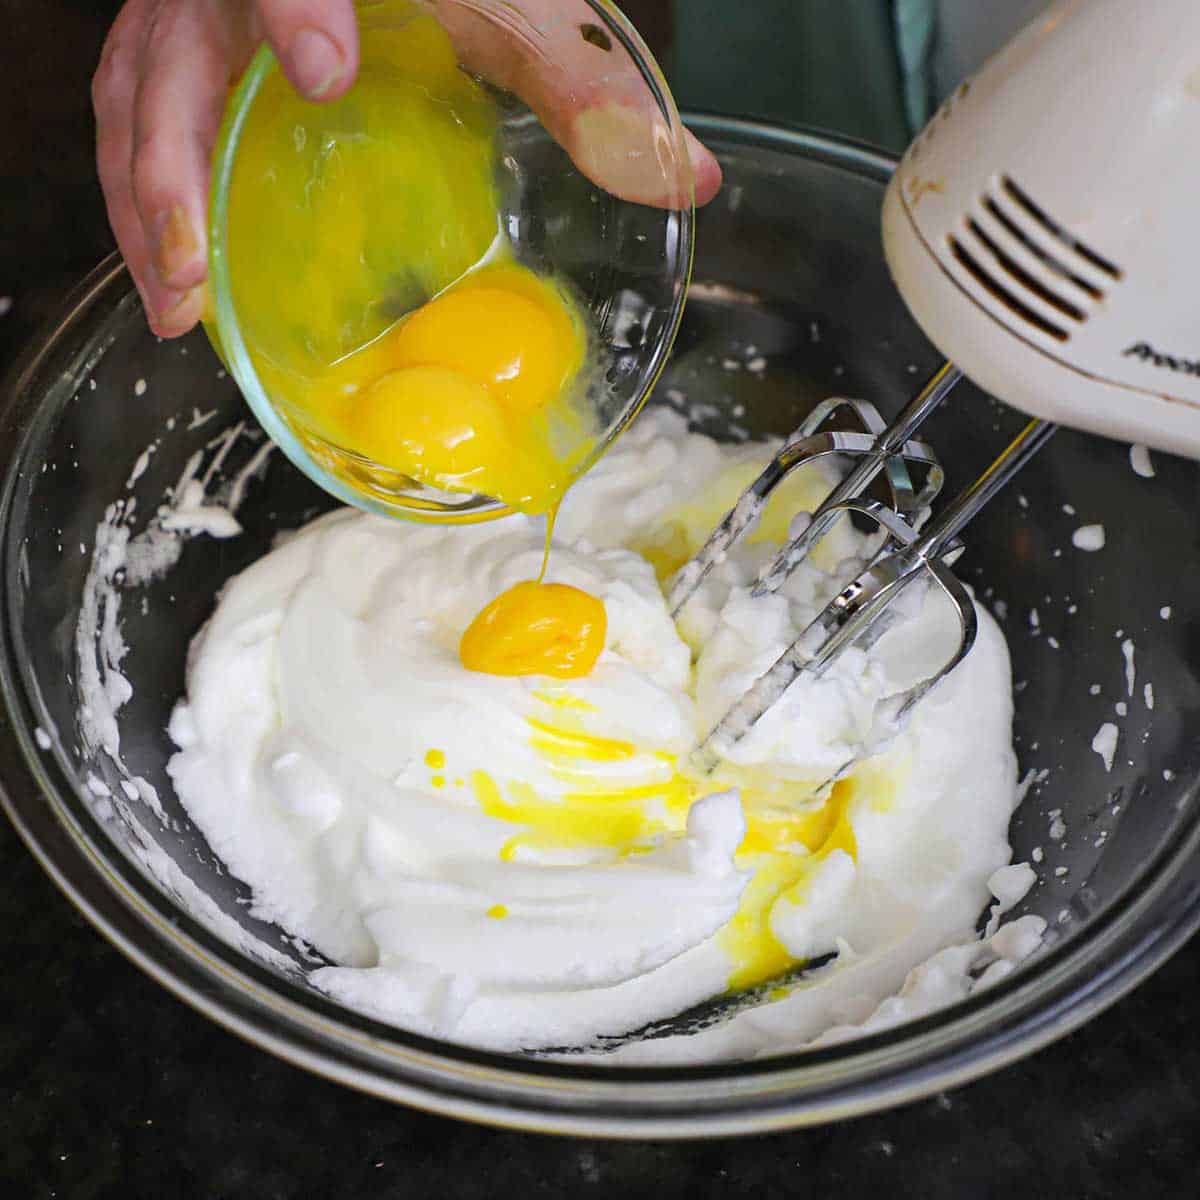
- Step 8: Gently mix in the egg yolks.

- Step 9: Dredge the stuffed chiles in flour.
- Step 10: Dip the chiles in the egg batter (it’s okay if they are not 100% covered with batter).
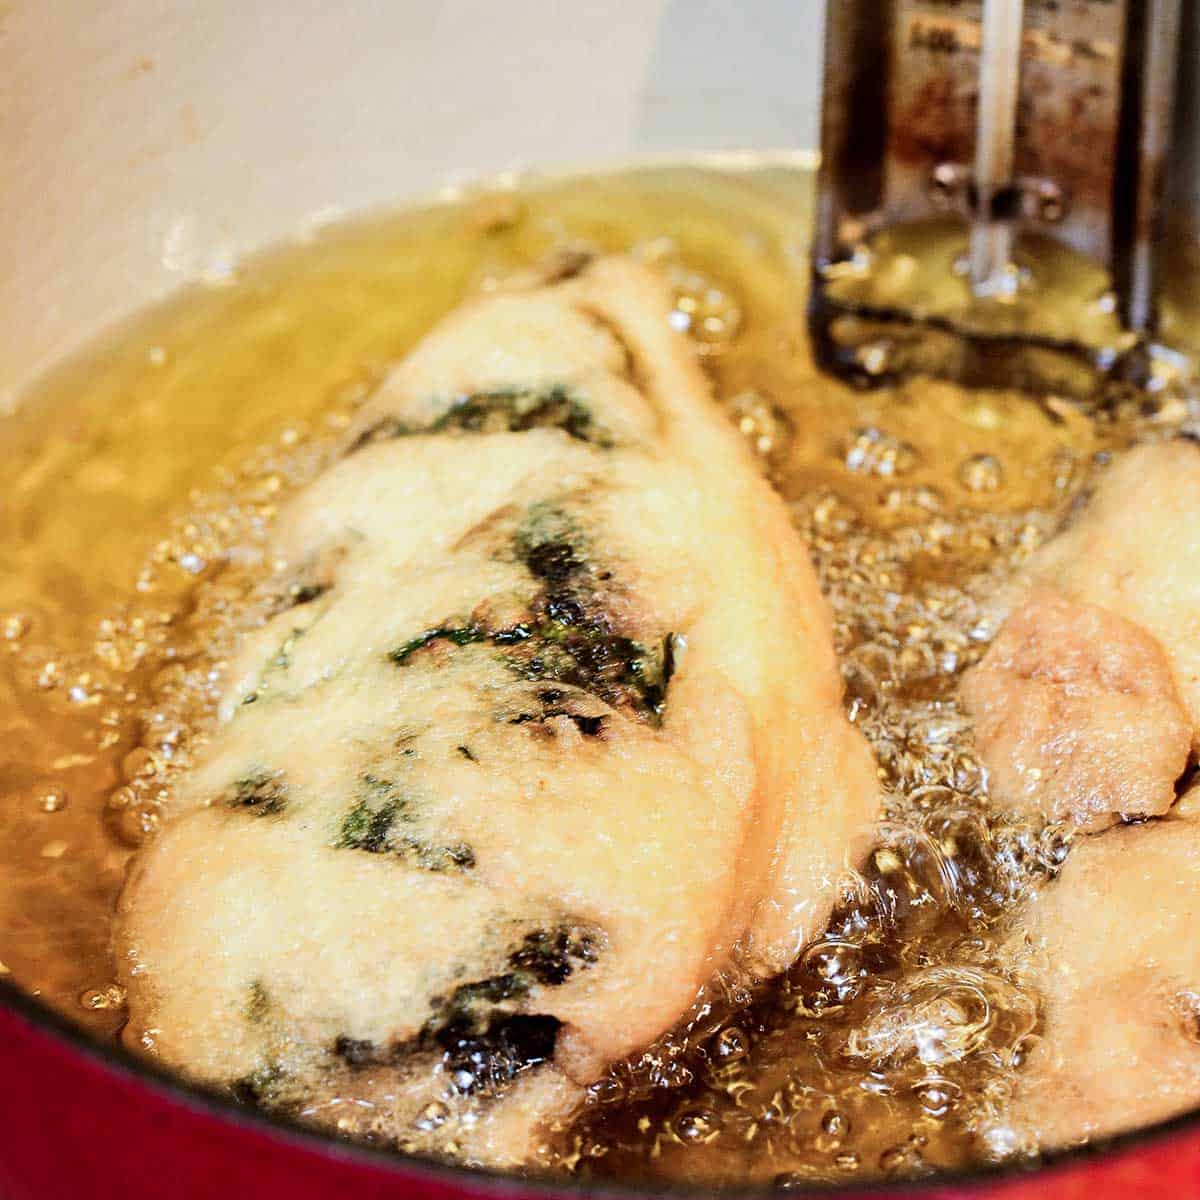
- Step 11: Fry them in 350°F oil until golden.
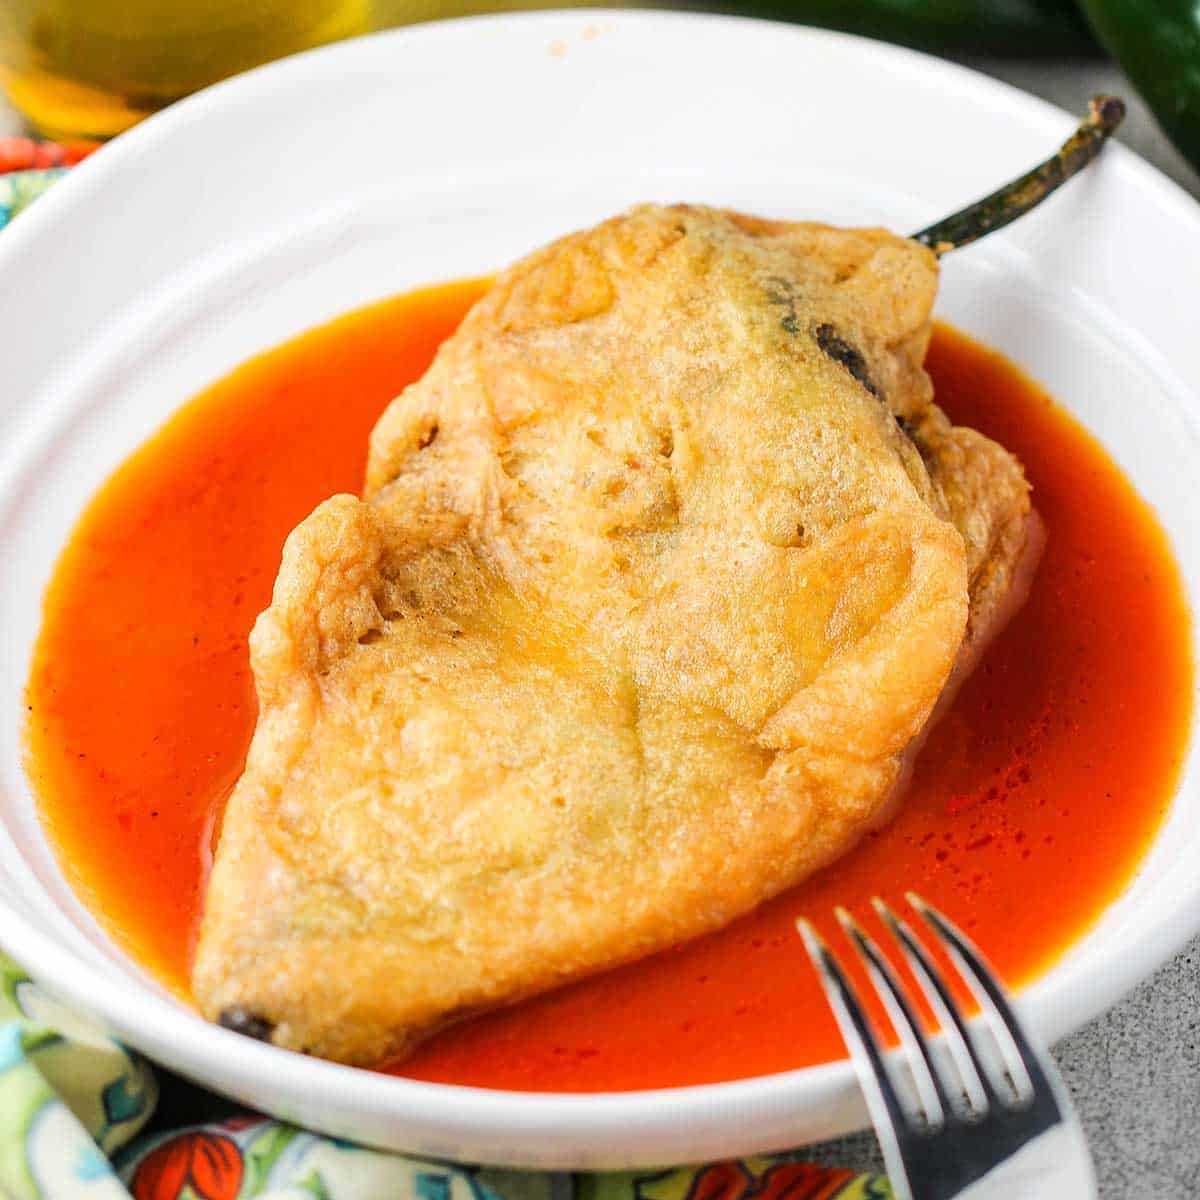
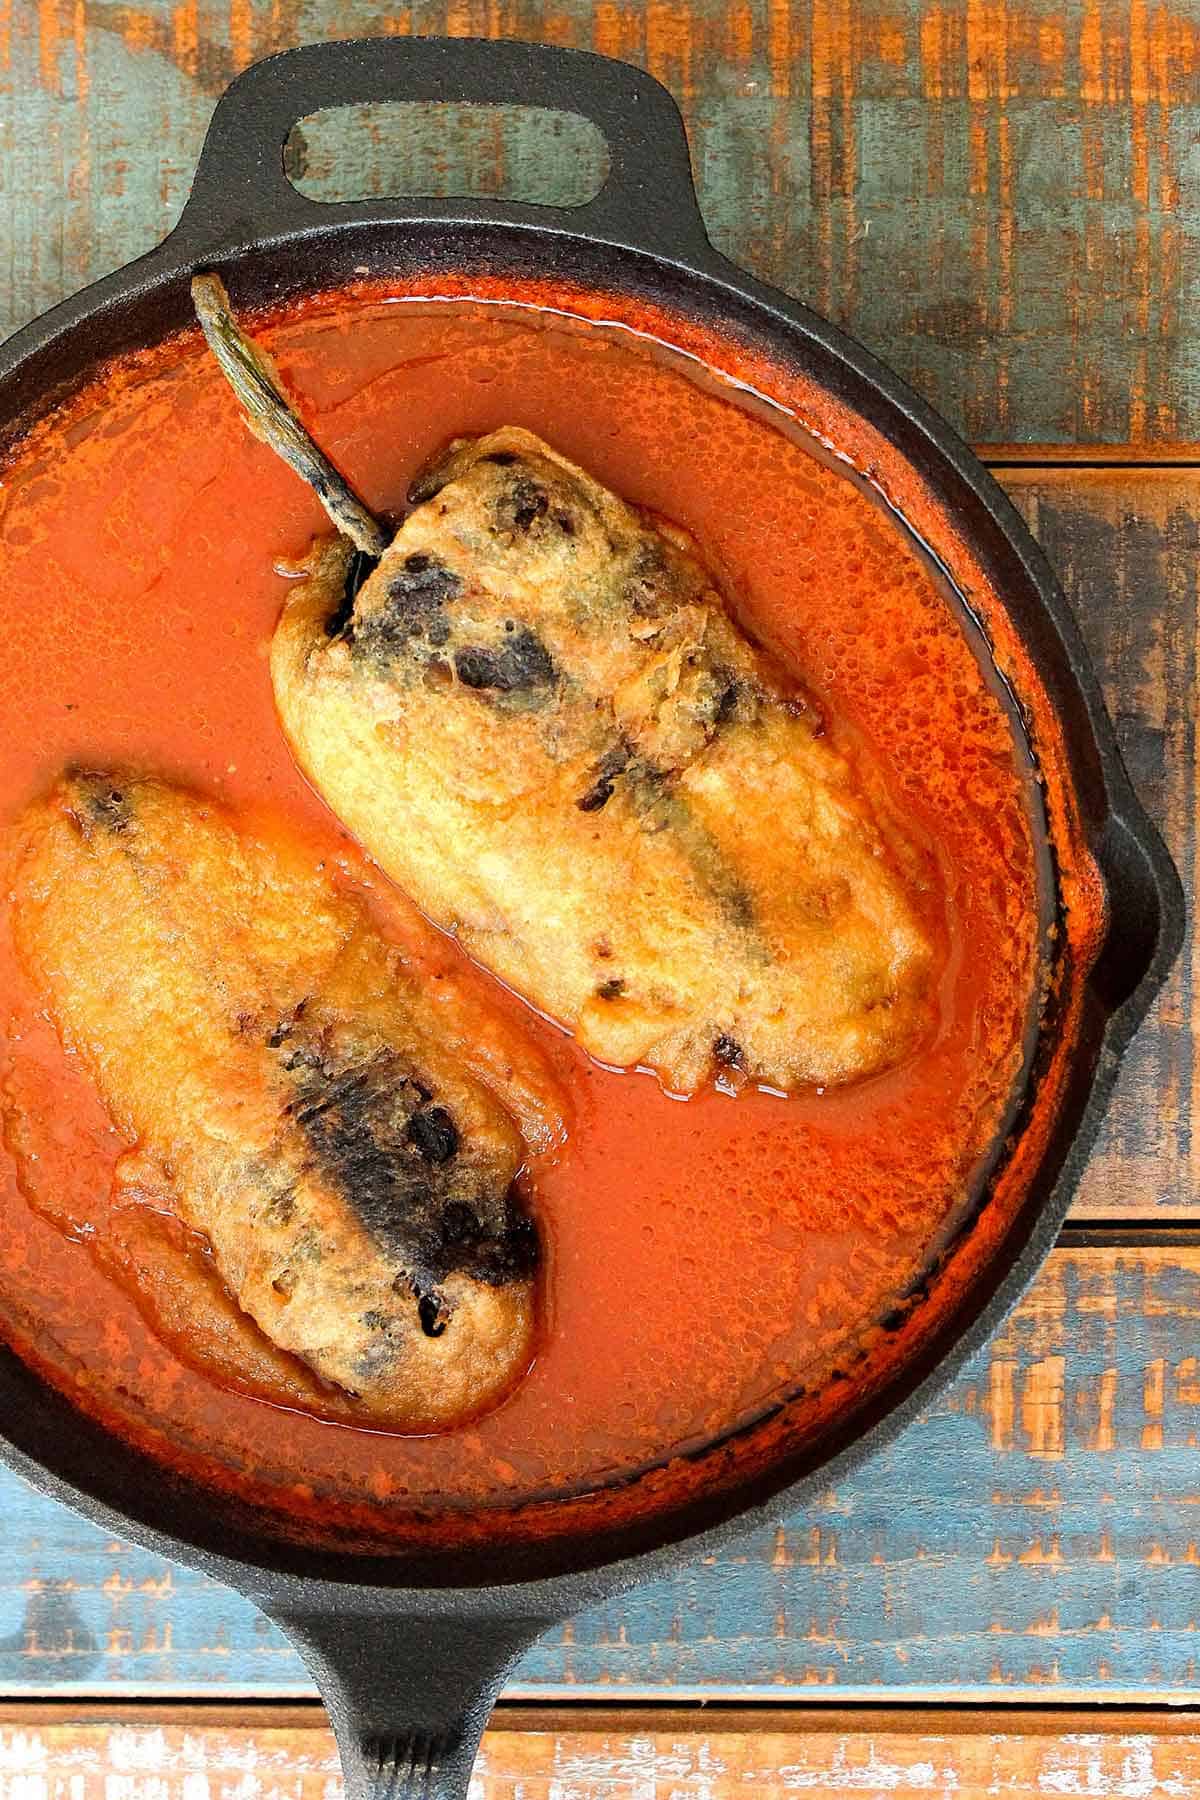
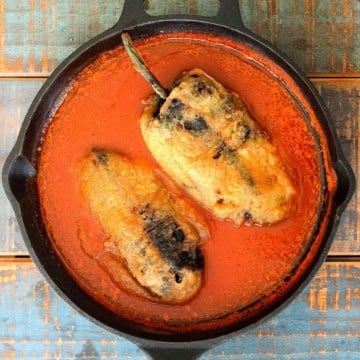
- Step 12: Serve on a shallow pool of the warmed red sauce.
🍽️ How to Serve
- Sauce First: For a professional presentation, ladle a generous pool of the warm red sauce onto the plate first, then place the fried pepper on top. This keeps the egg batter crisp while ensuring every bite gets plenty of sauce.
- The Classic Sides: To create the ultimate restaurant-style meal, serve your peppers alongside a scoop of fluffy Mexican rice and a side of authentic refried beans topped with a sprinkle of cheese.
- Fresh Garnishes: Brighten up the rich flavors with fresh toppings like chopped cilantro, thinly sliced white onions, or a few slices of creamy avocado.
- Add a Drizzle: A drizzle of Mexican crema or a dollop of sour cream provides a nice cooling contrast to the mild heat of the poblano peppers.
- Warm Tortillas: Always serve with a side of warm corn tortillas or flour tortillas to scoop up the melty cheese and extra sauce left on the plate.
🙋🏽♂️ Frequently Asked Questions
You can roast, peel, and stuff the peppers a day early to save time. For the best results, wait to prepare the egg batter and fry them until you are ready to sit down and eat, so the exterior remains light and crisp.
To maintain the texture of the coating, place them in an air fryer or a hot oven at 350°F until warmed through. Using a microwave is generally discouraged as it tends to make the delicate egg batter soggy.
This usually happens if the peppers are too wet or if they weren’t fully coated in flour before being dipped. Make sure to pat the skins completely dry and ensure the egg batter is thick and fluffy, so it clings to the surface during the cooking process. It’s okay if some of the pepper is visible after it’s fried
The poblano is the standard choice because of its wide shape and mild heat. It provides the perfect vessel for stuffing with cheese while holding up well to the roasting and frying process.
🇲🇽 More Classic Mexican Recipes


Ready to make the best Mexican dish in town? Go for it!
And when you do, be sure to take a photo of it, post it on Instagram, and tag @HowToFeedaLoon and hashtag #HowToFeedaLoon!
Authentic Chile Relleno with Cheese
Video
Ingredients
For the Sauce
- 1½ lbs tomatoes chopped, or 1 28 oz. can of whole tomatoes, with juice
- 1 cup chicken stock or vegetable stock, or water
- ¼ cup onion chopped
- 2 cloves garlic minced
- 1 tablespoon distilled white vinegar
- 1 teaspoon sugar
- 1 teaspoon Mexican oregano dried, or regular oregano
- 1¼ teaspoon Kosher salt
- 2 tablespoon corn oil
For the Chiles
- 4 large poblano chiles about 1 lb
- ½ lb Asadero cheese or Chihuahua or Monterey Jack cheese, coarsely grated
- 2 to 3 cups corn oil or vegetable oil, for frying
- 4 large eggs separated
- ½ teaspoon Kosher salt
- 1¼ cup all-purpose flour divided
Instructions
Make the Sauce
- Puree all sauce ingredients (except oil) in a blender until smooth. Then, strain through a mesh sieve into a bowl, pressing on the solids.1½ lbs tomatoes, 1 cup chicken stock, ¼ cup onion, 2 cloves garlic, 1 tablespoon distilled white vinegar, 1 teaspoon sugar, 1 teaspoon Mexican oregano, 1¼ teaspoon Kosher salt
- Heat oil in a deep, heavy large skillet over medium heat until it shimmers.2 tablespoon corn oil
- Carefully pour in the sauce and simmer gently, stirring occasionally, for about 10 minutes. (Sauce will still be thin).
- Taste, and season with pepper and more salt, if desired.
- Set aside, but keep warm over low heat.
Roast, Stuff, and Fry the Chiles
- Roast chiles on their sides over a gas flame over medium heat, turning with tongs, until skins are blistered and slightly charred, 4 – 6 minutes. (Or, broil on a rack about 2 inches from the heat)4 large poblano chiles
- Transfer to a large bowl and cover with plastic wrap; let stand for 20 minutes. (This can be done ahead of time.)
- Carefully rub off skins from chiles, leaving stems attached.
- Cut a slit lengthwise in each chile using kitchen shears or a sharp knife.
- Carefully cut out the ribs and the seedpod. Clean out all seeds with a wet paper towel, if necessary (Leaving the seeds will make the peppers hotter).
- Stuff chiles with cheese and enclose filling by overlapping the slit slightly, then transfer to a plate. (All of this can be done the day before.)½ lb Asadero cheese
- Heat ½-inch of the oil in another large heavy skillet over medium heat until it registers 350°F on a thermometer.2 to 3 cups corn oil
- While the oil heats, beat egg whites with ½-teaspoon salt, using an electric mixer until they just hold stiff peaks.4 large eggs, ½ teaspoon Kosher salt
- Whisk in the yolks, two at a time, just until incorporated. Next, whisk in ¼ cup flour.1¼ cup all-purpose flour
- Spread 1 cup of flour onto a plate. Generously dust chiles with the flour, coating all sides. Gently shake off excess flour.
- When oil is ready, dip chilies, 1 at a time, into egg batter, spooning it over chile to cover completely.
- Fry the chiles, turning once, until golden on all sides (Lap oil over any lighter areas, 4 to 5 minutes).
- Transfer chilies with a slotted spoon to paper towels to drain. At this point, you can heat your oven to 300°F, place the chiles on a baking rack, and then bake for 15 minutes. This will keep the chees nice and melty, crisp up the exterior, and render out a little more excess grease. Remove from oven.
- Meanwhile, re-heat the sauce.
- Ladle sauce onto plates and place a chili on top of the sauce.
Notes
- Chile choice: Poblano chiles are traditional and offer mild heat. For spicier rellenos, substitute Hatch or Anaheim chiles.
- Roasting tips: Roast chiles until skins are fully blistered for easy peeling. Steam in a covered bowl or bag for 10 minutes before peeling.
- Cheese options: Asadero and Oaxaca are classic, but Monterey Jack, Pepper Jack, or Chihuahua cheese all melt beautifully. Avoid pre‑shredded cheese.
- Batter success: Separate eggs while cold, then bring to room temperature before whipping whites for a lighter, fluffier batter.
- Frying advice: Keep oil at 350°F (175°C). If the oil is too cool, the batter will absorb oil; too hot, and it will brown before cooking through.
- Make‑ahead: Chiles can be roasted, peeled, and stuffed up to 1 day ahead; batter and fry just before serving for the best texture.
Jennifer says
I have always loved these but have been intimidated by the process. And I don’t like to be intimidated by food. So I watched your video (probably a dozen times!) and made them tonight. I had to use pepper Jack because my grocery here doesn’t have many Mexican cheeses. I really had little faith I could pull this off….even my bf said “Having fun?” And I said no. Which does not happen often. I enjoy cooking. But I just knew I was going to fail. I didn’t! It was so good. For my first time I was pretty happy. No thermometer to test the oil so I did my normal…put a bit of batter to make sure it sizzled. Worked fine. Definitely making again. Maybe when we have friends over. And I’ll make your rice and beans too!
Kris Longwell says
Jenn!!! You just made our day! We get it! Rellenos can be very intimidating! But you did it!!! Once you get the hang of it, it’s not hard at all! Sounds like you prepared them perfectly! Now, next time you make them… you don’t have to stress and just have fun! Thanks so much for sharing and for the awesome review. That means the world to us! Please stay in touch! Best, Kris & Wesley
Susan says
Looks delicious! I have a question, though. Can I prep and fry the chilies the night before and then back them in the morning for a brunch? It would save a lot of time.
Kris Longwell says
Hi Susan! Well, I wish I could say that would work, but, I’m pretty certain the fried rellenos would get pretty soggy if they sat over night. You can certainly roast them and even stuff them the night before. If you’re making a sauce to serve with it, you can do that the night before. The night
before you can have everything prepped (the batter, the oil) and ready to go for the next morning. And then coat with the batter and fry before serving. They fry up quickly, so it’s not a ton of time. I understand your concern, though. We’ve served these for brunch before, and to say they were a hit would be an understatement. Everyone had fun watching us frying them up. Keep us posted and let us know if there’s anything else we can help with. Best, Kris & Wesley
Mark Hall says
Best ever- had to make some modifications because the Mexican cheese was not available. Used Monterey Pepper Jack instead. Delicious!! as usual.
Kris Longwell says
Hi Mark! Woo hoo!!! So so took on making homemade chile rellenos and had such great success! Monterey Jack is great! Thanks so much for sharing and for the great review! That always means so much to us!!! Keep on cookin’!!
Sandra Kisling says
This was good however at the end of your video do you put it on the oven for 5 minutes or was it the broiler for 5min?
Kris Longwell says
Hi Sandra! Sorry for the delayed reply and sorry for the confusion. This recipe has evolved for us over the years. We should have updated the recipe to reflect that we often place the prepared chilis into the oven for about 15 minutes. This is especially good if you are having to make the rellenos in batches. Then, they will all reheat evenly, and even crisp up a bit more. We’ve update the recipe to reflect this. Thank you SO MUCH for bringing this to our attention!!! Thank you so very much for sharing and for the GREAT review. That means the world to us!!! Please stay in touch! Best, Kris & Wesley
Marilyn says
Can’t wait to try since I am a New Mexican girl I prefer hatch chili’s. Believe it or not I found Hatch Chili’s at our local Fred Meyers in Alaska. So, yes tomorrow is Chilli relleno day, my mom’s favorite. I intend to add chorizo. Thank you for the fun lesson
Kris Longwell says
Hi Marilyn! Hatch chiles are FANTASTIC! And the addition of chorizo will be amazing. Please let us know how it turned out!! Best, Kris & Wesley
Nancy says
Ok guys, this was stupid good! But could I make the sauce thicker some how? And if I wasn’t super gentle the egg mixture would come off. But I am officially following you two.
Kris Longwell says
Hi Nancy! We love the slightly thinner sauce for this, but you could certainly thicken it with a little cornstarch slurry (mix together 1 Tbsp cornstarch with just enough water until its syrupy). Add a few drops to the sauce and stir until thickened to your desire. We find that spooning the hot oil over the top of the relleno as it is cooking helps the batter adhere to the pepper. Hope this helps!
Adri says
Made this for Mother’s Day! We are Mexican and the sauce was on point *chef’s kiss*! The ratios of the ingredients were balanced, and it was new to us to strain the sauce, but I’m glad I did it, it did have a silky texture. I didn’t add the sugar, but I did simmer it twice as long and it was sweet enough. Chile rellenos is my mom’s favorite dish, but she has different dietary needs nowadays so I made some modifications. We wanted gluten free and lower fat, so I dusted with cornstarch instead of flour. The batter was just egg, and we baked it in the oven I think around 30 minutes until golden brown. We used silicone mat for nonstick. It came out really really good, she loved it! We’ll be making it again.
Kris Longwell says
Hi Adri!! We can’t even begin to tell you how thrilled this makes us!! Sounds like you made it perfectly and what a lovely way to show your mother how much we love her. And we’re so honored that we helped a little bit. Thanks so much for letting us know and for the wonderful review. That means the world to us!!! All the very best, Kris & Wesley
Seth says
Looks great! Will be making for my sister when she comes to town next. Great to have the sauce recipe as well.
Kris Longwell says
Hi Seth!! Thanks much! This is one of our all-time favorite dishes! We really hope you and your sister enjoy it as much as we do. And please let us know how it turns out! All the best, Kris & Wesley
Katherine says
Very fresh, simple and delicious, thank you for sharing. I used Anaheim chilis instead and they were fine, but I’ll use Poblano next time. My finished product wasn’t nearly as pretty as yours (the batter was not sticking very well), but that’s just inspiration to keep trying! Served with spanish rice and refried beans and my teenage son and husband could not stop raving…
Katherine says
Also wanted to add that I used the Vitamix for the sauce so didn’t feel the need to strain it.
Kris Longwell says
Wow! Katherine! That all sounds wonderful. Glad you had success with the anaheim peppers! When you can, give the poblano’s a go, we think you’ll like them a lot, too. The batter definitely can be tricky when getting it to stick. Just takes practice, but sounds like you did fantastic. Thanks SO MUCH for letting us know and the great review. That means the world to us!! All the best, Kris & Wesley