Bakery-Style Homemade Italian Rolls
Servings: 5
Calories: 437kcal
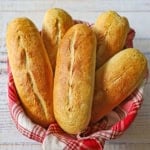
These bakery-style Italian rolls feature a sturdy, chewy crumb and a thin, crackly crust, making them the perfect foundation for a loaded hero. Designed for use with a silicone channel mat, they maintain a professional torpedo shape that’s ideal for cradling heavy fillings like sausage and peppers.
Print Recipe
Equipment
- Digital scale or dry measuring cups
- Stand mixer with dough attachment
- perforated silicone mat with channels
- perforated half-baking sheet pan
- razor or very sharp knife (small)
- sturdy pan for holding boiling water
- baking rack for cooling rolls
Ingredients
- 1½ cups warm water (350ml), 105°F
- 2¼ teaspoon active dry yeast (0.25 ounces/7 grams), 1 packet
- 1 tablespoon sugar
- 4 cups bread flour (500 grams), preferably organic
- 2 tablespoon extra-virgin olive oil
- 1½ teaspoon fine sea salt
- cooking spray
- 1 egg beaten with 1 tablespoon water
Instructions
- In a stand mixer, combine the warm water, yeast, and sugar. Gently whisk until combined. Let it rest for 5 to 8 minutes, until it becomes foamy. See NOTES.1½ cups warm water, 2¼ tsp active dry yeast, 1 tbsp sugar
- Add 2 cups of the flour (approx. 125 grams per cup) and the olive oil. Mix with the dough attachment until the mixture is fully combined. You may need to scrape down the sides of the bowl with a spatula.4 cups bread flour, 2 tbsp extra-virgin olive oil
- Add the salt and the remaining 2 cups of flour gradually. Let the mixer run on medium for 8 minutes. The dough should be smooth and elastic. If it is sticking to the side of the bowl, add another tablespoon of flour. It should be "tacky" but not "sticky."1½ tsp fine sea salt
- Spray a bowl (or proofing container) with cooking spray.cooking spray
- Form the dough into a smooth ball, and place it in the oiled bowl (or container). Turn the dough over a time or two to coat it with the oil. Cover and let it rise (proof) in a warm spot for 60 to 90 minutes until doubled in size.
- Gently punch the dough down and then turn it out onto a lightly floured surface (not too much flour!). Divide the dough into 5 equal pieces (a digital scale helps you do this). Each ball should be around 165 grams. Cover with a kitchen towel and let them rest for 15 minutes.
- Working one piece of dough at a time, flatten the ball into a rectangle (about 5x7"). Take the long edge furthest from you and fold it to the center. Press the edge into the dough with your fingertips to "tack" it down. Take the edge closest to you and fold it up to the center (like you are folding a piece of paper to put into an envelope). Now, fold the entire log in half again, bringing the top edge to the center and then the bottom edge to the center. Seal with your fingetips.
- Turn the dough seal-side down, and place your palms over the center of the log. Gently roll the log back and forth on the counter. As you roll, slowly move your hands apart toward the ends of the log. Don't just press down, press outward. Taper the ends slightly.
- Place the silicon mat with channels on the perforated sheet pan. Pick up your shaped log and look for the seam. Place the log into the silicone channel with the seam-side facing down. Repeat with the remaining dough pieces.
- Spray a large piece of plastic wrap with cooking spray and then loosely cover the silicone mat with the dough in the channel. Place in a warm spot for 45 minutes. They should look puffy and fill the width of the channels.
- Preheat oven to 400°F. Bring 1 to 2 cups of water to a boil. Place a pan on the bottom rack of the oven and place another rack in the middle.
- In a small bowl, combine the beaten egg with 1 tablespoon of the water. Gently brush the tops of the rolls with the egg wash. Use a razor blade (or very sharp knife) to make one, long slit (about ½-inch deep) down the center of each roll.1 egg
- Put the tray on the middle rack and immediately pour (carefully) the boiling water into the pan on the bottom rack. Shut the door immediately and bake for 17 to 19 minutes, until the rolls are a deep golden brown.
- Remove from the oven and let them cool in the mat for 5 minutes. Then, move them directly to a wire rack to finish cooling. Store the rolls in a brown paper bag at room temperature. The paper allows the bread to "breathe," which keeps the crust from getting soft and chewy.
Video
Notes
NOTE: Watch the video in the recipe card for visual guidance.
- Test Your Yeast: If the mixture of yeast, warm water, and sugar does not become foamy or creamy within 5–10 minutes, the yeast is no longer active. Discard the mixture and start again with fresh yeast; using "dead" yeast will prevent the dough from rising and result in dense, flat rolls.
- Precision Portioning: For a professional "tall" profile that fills out your silicone channels, use a digital scale to portion your dough into 160g–170g pieces. This ensures every roll is uniform in size and has enough volume to rise upward rather than spreading.
- Water Temperature: Aim for a water temperature between 105°F and 110°F. Water that is too cold won't activate the yeast, while water above 120°F can kill it instantly.
- The Steam Secret: Don't skip the pan of boiling water on the bottom rack. The steam keeps the dough's surface moist during the first few minutes of baking, allowing the rolls to expand fully (oven spring) before the crust sets and becomes crackly.
- Proper Cooling: To maintain the integrity of the crust, move the rolls from the silicone mat to a wire cooling rack immediately after baking. This prevents steam from being trapped underneath, which can lead to a "soggy bottom."
Nutrition
Calories: 437kcal | Carbohydrates: 76g | Protein: 14g | Fat: 8g | Saturated Fat: 1g | Polyunsaturated Fat: 1g | Monounsaturated Fat: 5g | Trans Fat: 0.004g | Cholesterol: 33mg | Sodium: 713mg | Potassium: 126mg | Fiber: 3g | Sugar: 3g | Vitamin A: 50IU | Vitamin C: 0.004mg | Calcium: 21mg | Iron: 1mg